
This article describes necessary steps for first-time ggRock Image setup and configuration.
Table of Contents
Executive Summary
Required Time: 45 Minutes (Seamless Boot) - 120 Minutes (Image Creation Tool)
Description: ggRock Images (System and Games images) are where all of the data you create and utilize (Windows Operating System, Games, Applications, etc) are stored. Before following this guide, ensure that you have followed the "Install the Debian OS on Your Server", "Install the ggRock Server Application", "Accessing the ggRock Server Application", "Configure the ggRock Array", and "Configure Client Machines for Network/Diskless (PXE) Boot" guides.
System Image Creation
1. Create a System Image.
Here you have two choices, you may utilize the new and simplified Seamless Boot process (recommended) to create your image, OR you may utilize the legacy ggRock Image Creation Tool process.
It is recommended to use the Seamless Boot process to create your System Image because it is a much faster and more efficient process with fewer steps.
For a preview of the Seamless Boot Process, refer to the following video clip:
Creating a System Image Using the ggRock Seamless Boot Process
Creating a System Image Using the ggRock Image Creation Tool (Legacy Process)
First-Time Power On
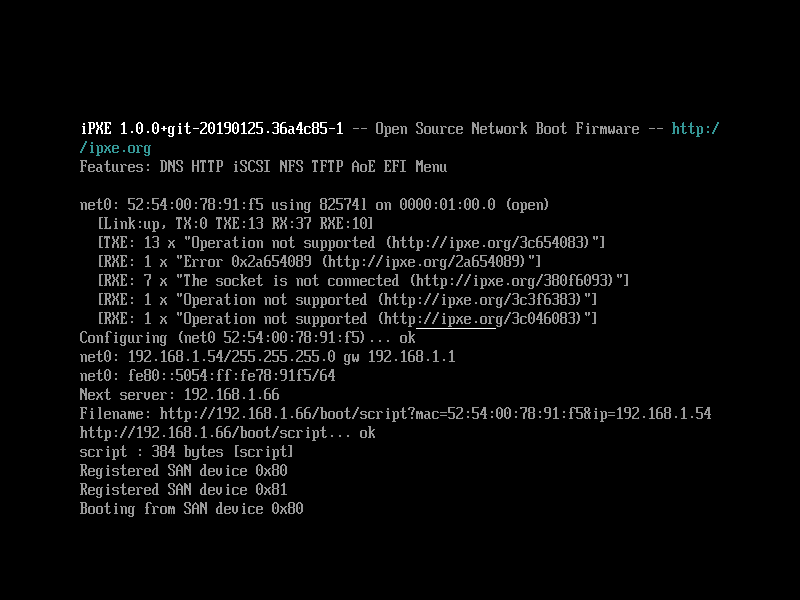
2. Power on and PXE Boot your test Machine for the first time. (On average with a typical network configuration, the PXE boot process should take around 60 seconds).
-
Observe the iPXE Boot Process
-
Observe the Windows Boot Logo
-
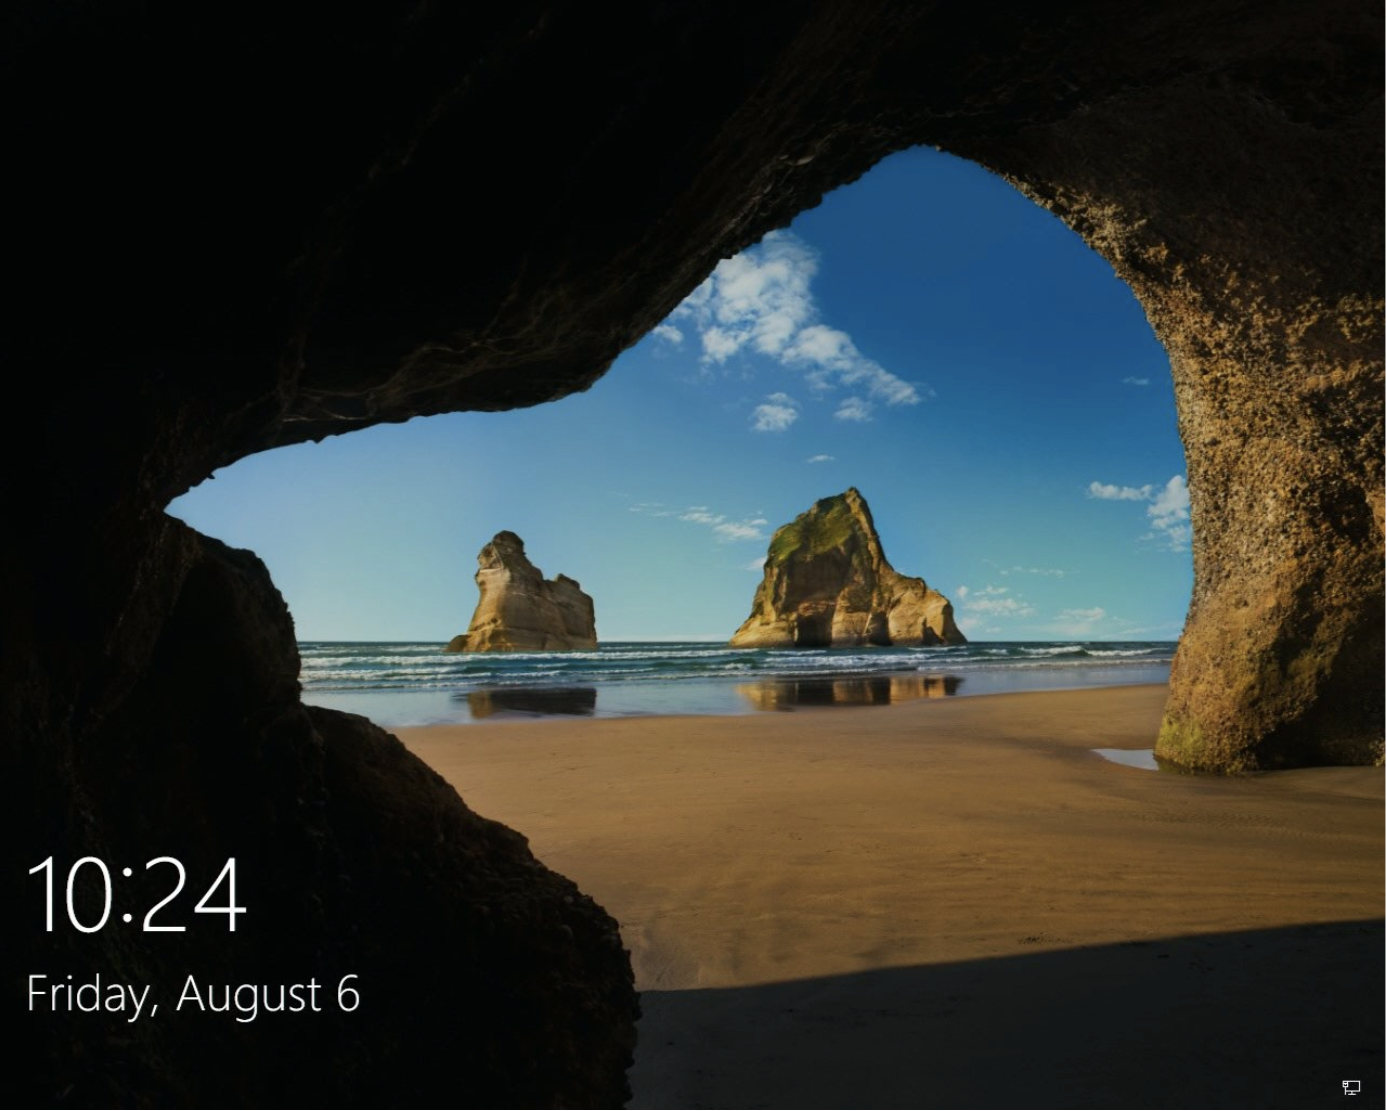
Observe the Windows Login Screen.
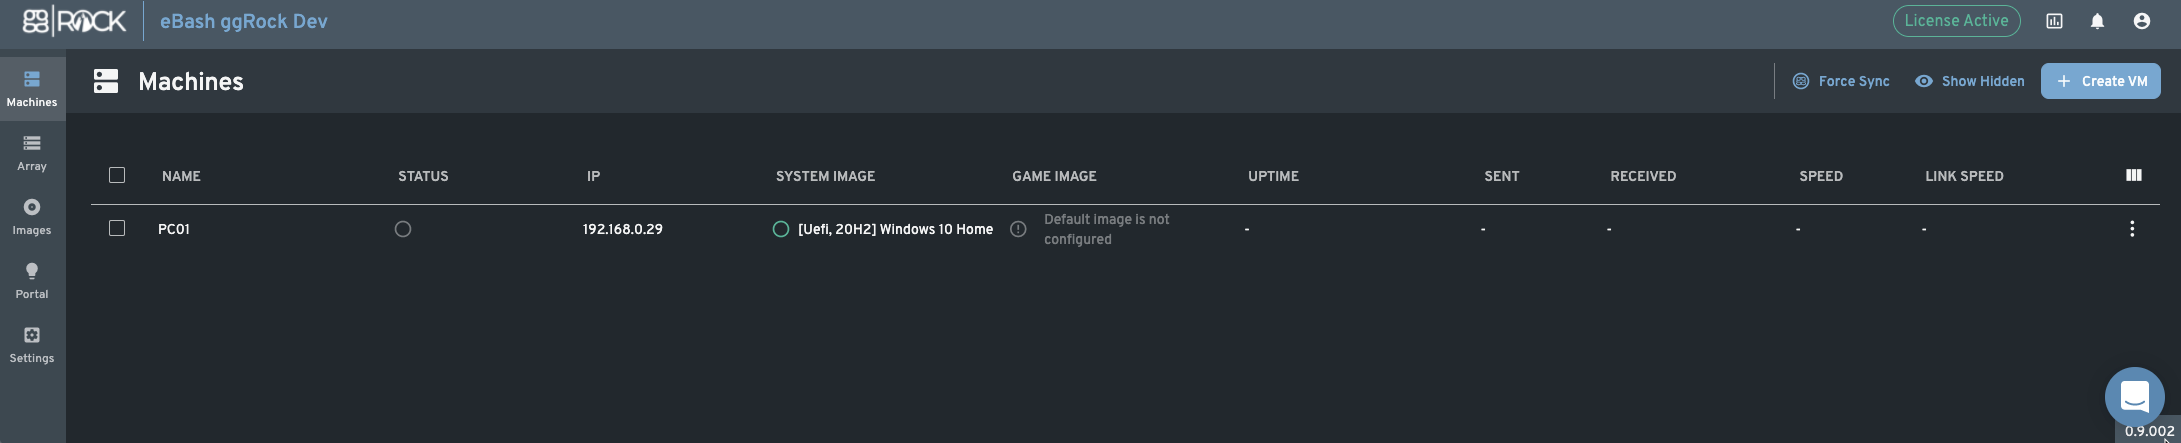
3. Once your Machine boots, a new entry will be created in the ggRock Web UI under the Machines tab.
NOTE:
For more information about what is displayed on the ggRock Machines Tab, please refer to the Machines Manual.
Games Image Creation
4. Determine Array Space for creation of the Games Image. Before we create a Game Image we need to determine how large we can make it based on the free space in your array. It's a good rule to leave (Number of Machines * 10 GB Per Machine for Writeback Cache) + 15% total capacity of free space in the Array, rounded down for reserve. For simplicity's sake in this example, let's assume that we want to run 10 Machines.
In the case of this example, we can allocate 50.62GB for a Game Image:
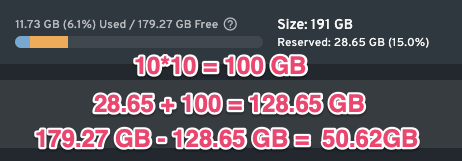
Maximum Games Image Size Calculator
Example:
NOTE:
You CAN NOT reduce your Image Volume Size. You can only increase it in the future. Therefore, having some margin to grow and now occupy all the space in the Array is considered a best practice.
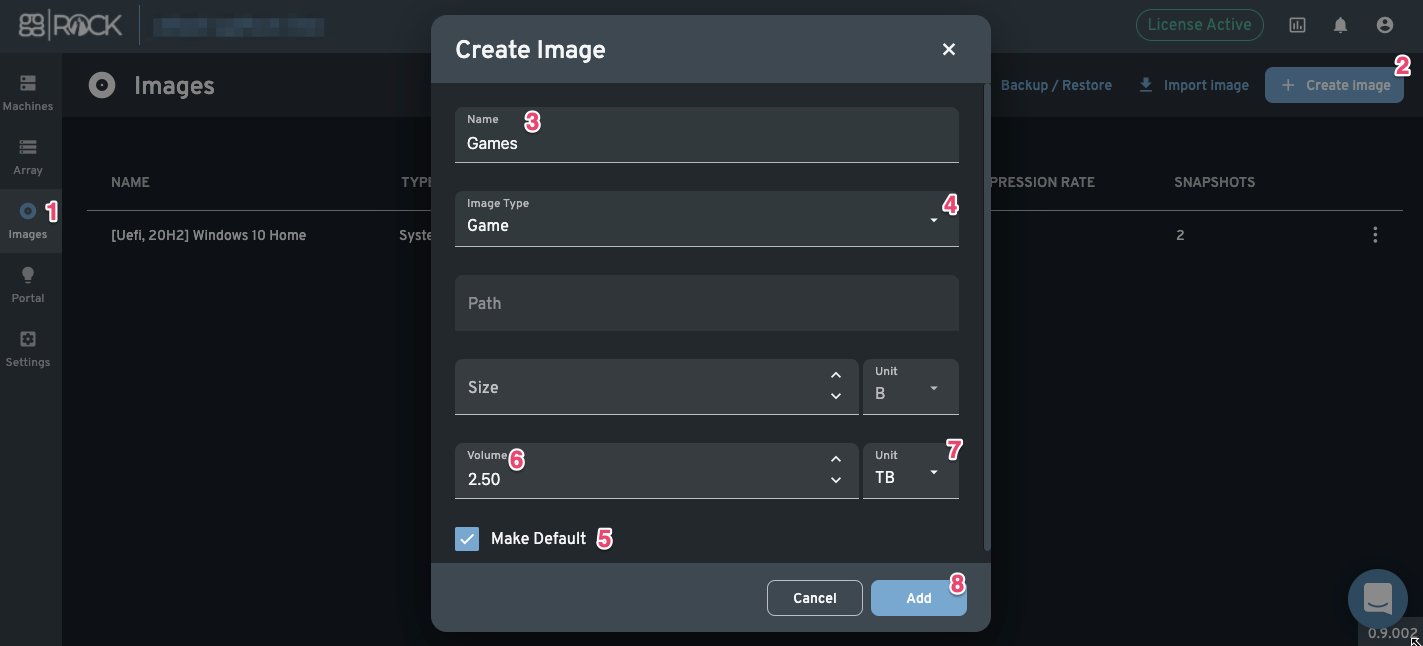
5. Create a Games Image. Navigate to the "Images" Tab, click the "Create Image" button, give the image a name, and set the volume size to the value calculated in step 3. Click the "Add" button.
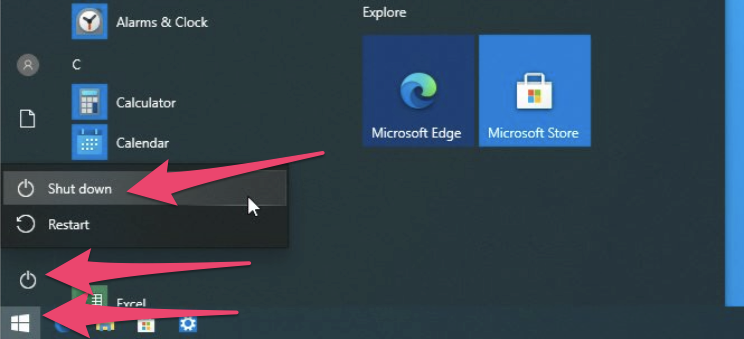
6. Shut the test system down. Click the "Start" button, then click the "Power" icon, then click "Shut down".

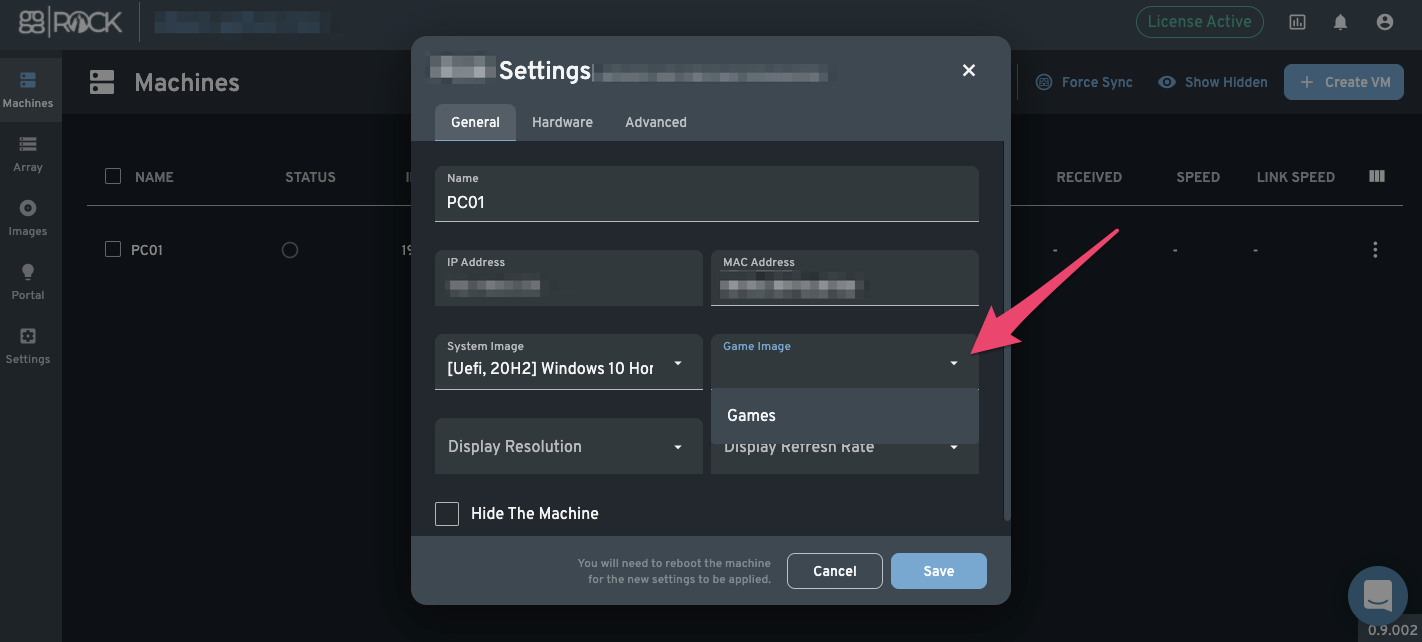
7. Add the newly-created Game image to your test Machine. Since the test Machine was initially created before the Game image was set as the default - it will not retroactively be added to this test Machine (it will be added to all other new Machines automatically, however). We need to navigate to Machines -> Machine Menu -> Settings and set the Game Image, then Save.
Games Image Initialization
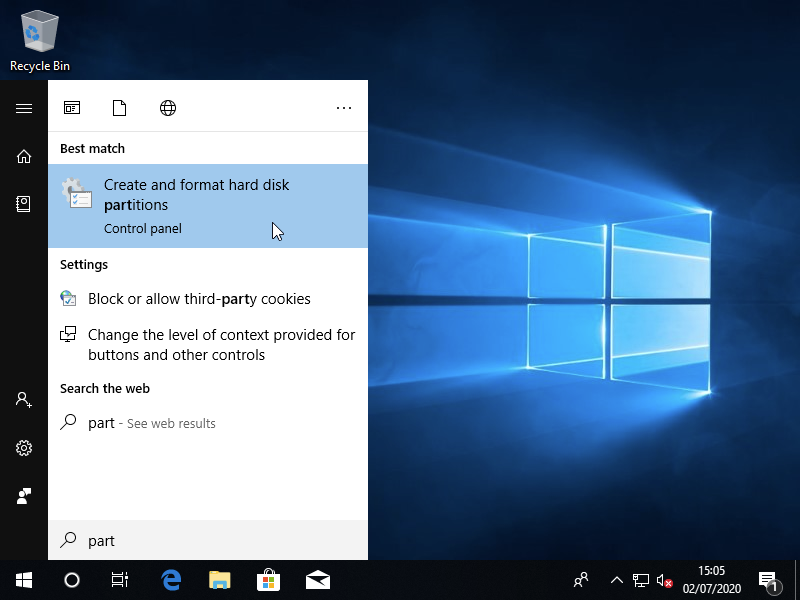
8. Power on the test machine once again, then launch the Disk Management Snap-In by opening the Start Menu and start typing part, then select Create and format hard disk partitions.
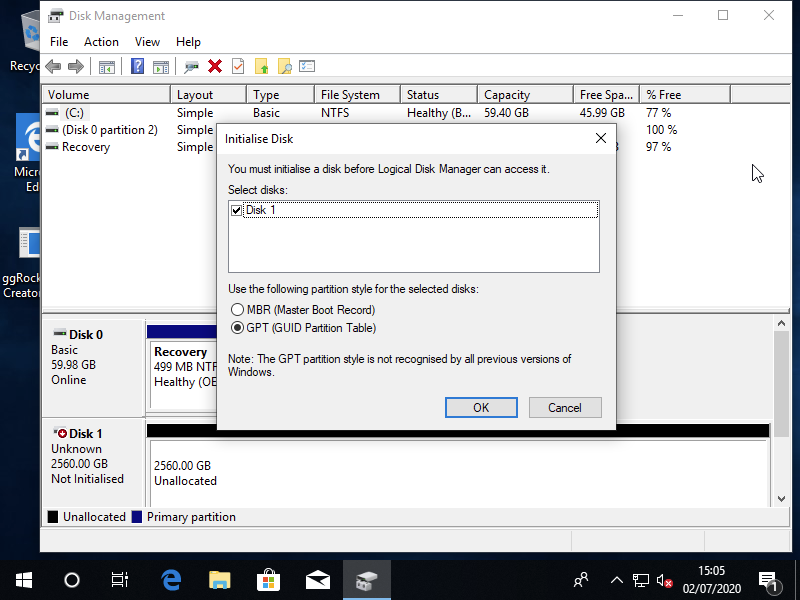
9. Because the newly-added Game Disk is unformatted, the Disk Management Snap-In will present an "Initialize Disk" dialog. Think of the unformatted game disk as an empty parcel of land. Initializing the disk paves the parking lot with asphalt. Select the "GPT (GUID Partition Table)" radio button, then click the "OK" button.
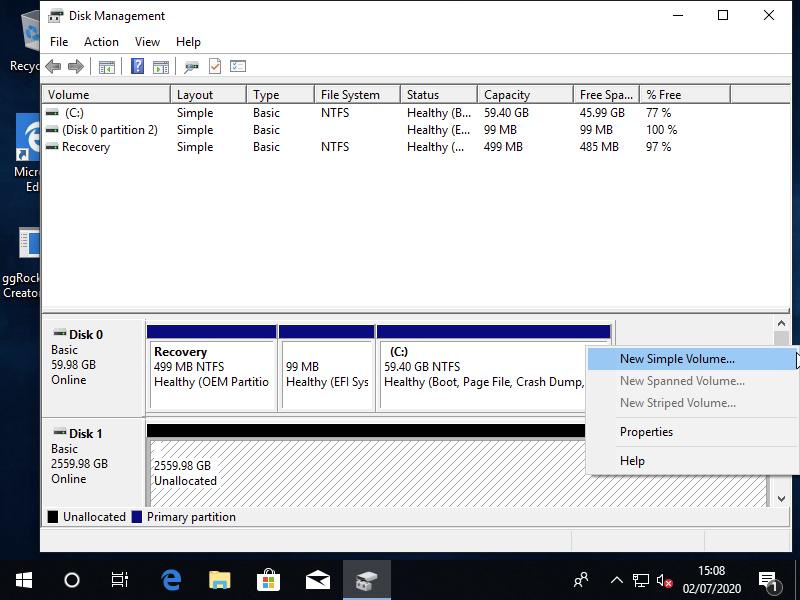
10. Now that the Game Disk is initialized, a volume must be created. Think of creating a volume as painting the parking spaces on the parking lot for the cars (data) to reside in. Right-click on the unallocated space, then click the "New Simple Volume" context menu item.
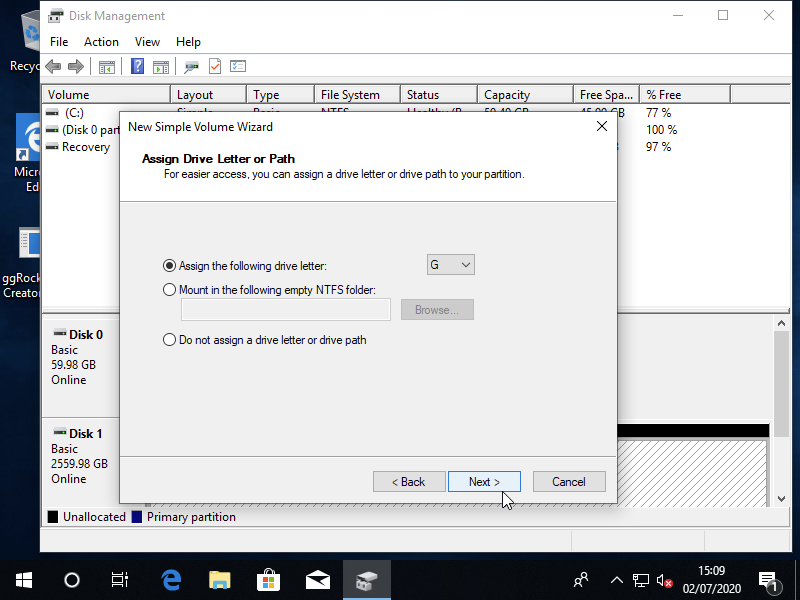
11. Start the Wizard, leave the volume size as default (maximum allocation), press Next, then Choose a drive letter for your DIsk. In the case of this example, "G:\" was selected. Click the "Next" button.
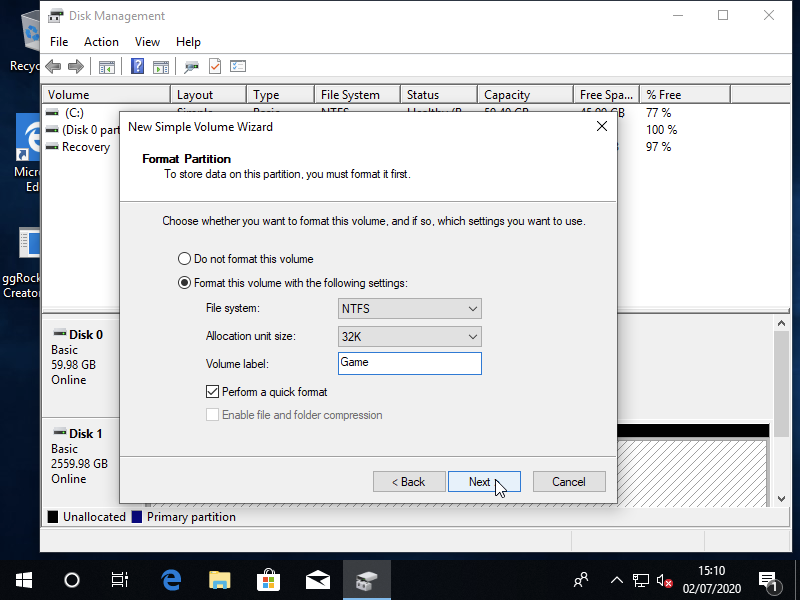
12. From the "New Simple Volume Wizard" dialog, select the following options:
-
Select the "Format this volume with the following settings:" radio button.
-
From the "File system:" drop-down, select "NTFS".
-
From the "Allocation unit size:" drop-down, select 32K.
Allocation Unit should be set to 32K, with no exceptions.
-
In the "Volume label:" text box, enter anything (In the example, "Game" was used).
-
Place a check next to "Perform a quick format".
Click the "Next" button.
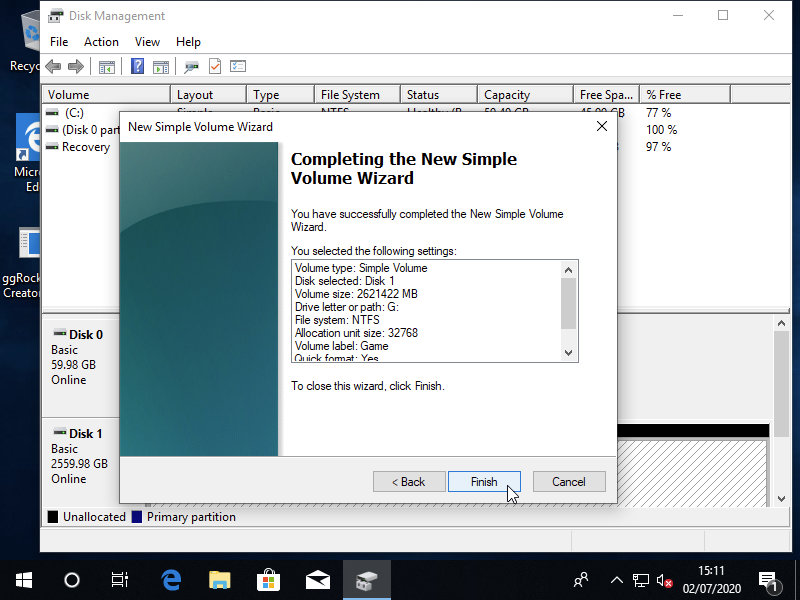
13. Review the selected settings, making any changes as desired, then click the "Finish" button.
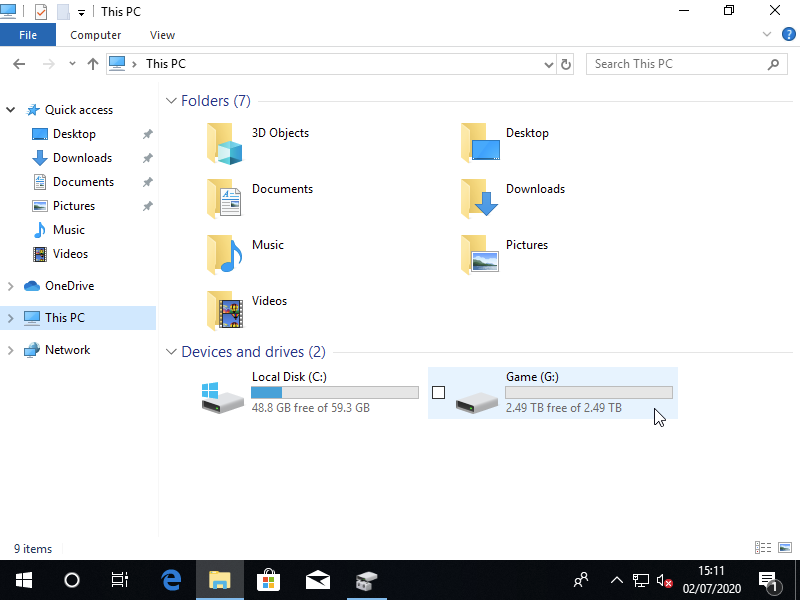
14. Open a new Windows File Explorer window. Observe that the Game drive is now mounted to the drive letter G:\ and its formatted capacity is the value configured in step 5.
15. Shut the test system down. Click the "Start" button, then click the "Power" icon, then click "Shut down".
First-Time Application of Writebacks
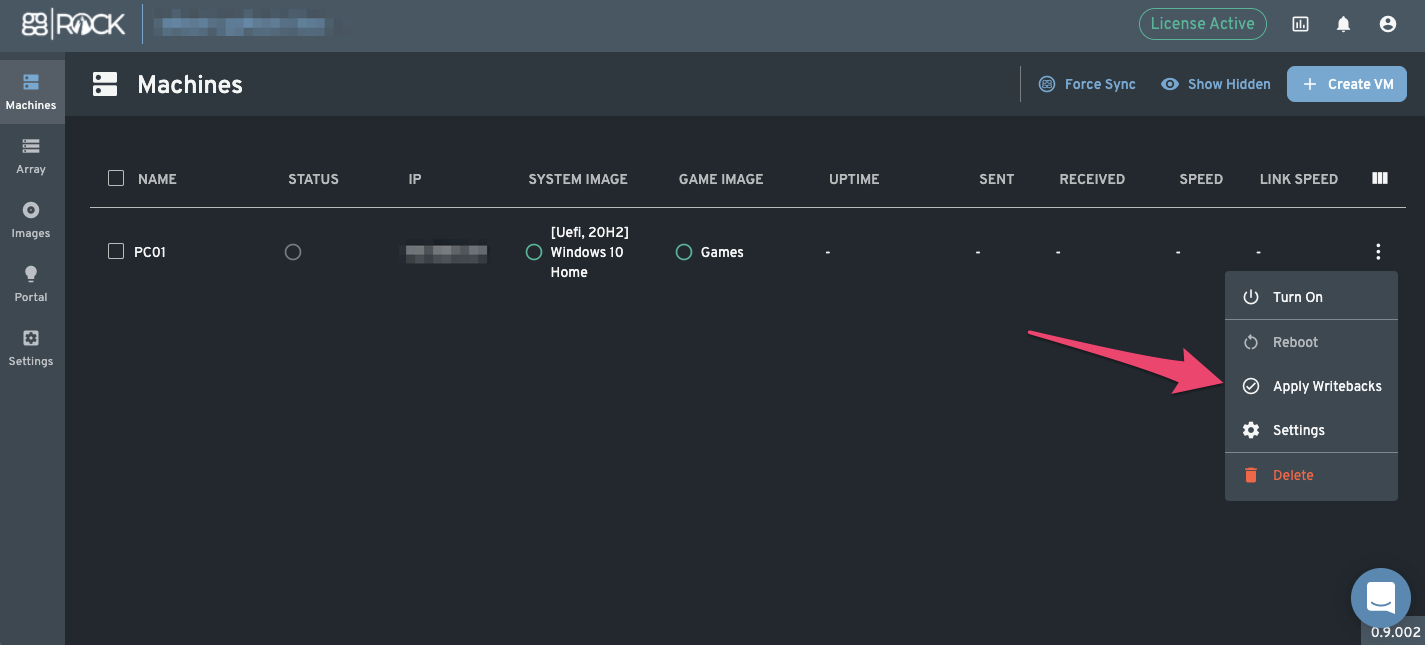
16. Apply Writebacks. ggRock saves changes you have made to your Machines as Writebacks.
NOTE:
Each Image (System or Game) has its own Writeback Cache on the server for every one of your Machines. When you have made changes to the Machine that you want to keep you need to Apply Writebacks from that Machine to commit the Writeback Cache to the image as a new snapshot.
In this example, we will apply writebacks for both the system and games images simultaneously with a shortcut in the Machine Menu.
Navigate back to Machines -> Machine Menu -> Apply Writebacks
For more information on Writebacks please refer to the "How Writebacks and Snapshots work" guide.
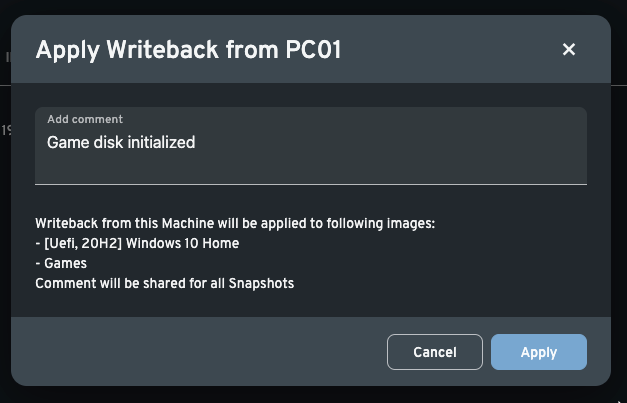
17. Enter a comment for the writeback we are applying. This comment will be stored for both the system and games images and will be viewable later, so it is important that it be recognizable and descriptive in nature.
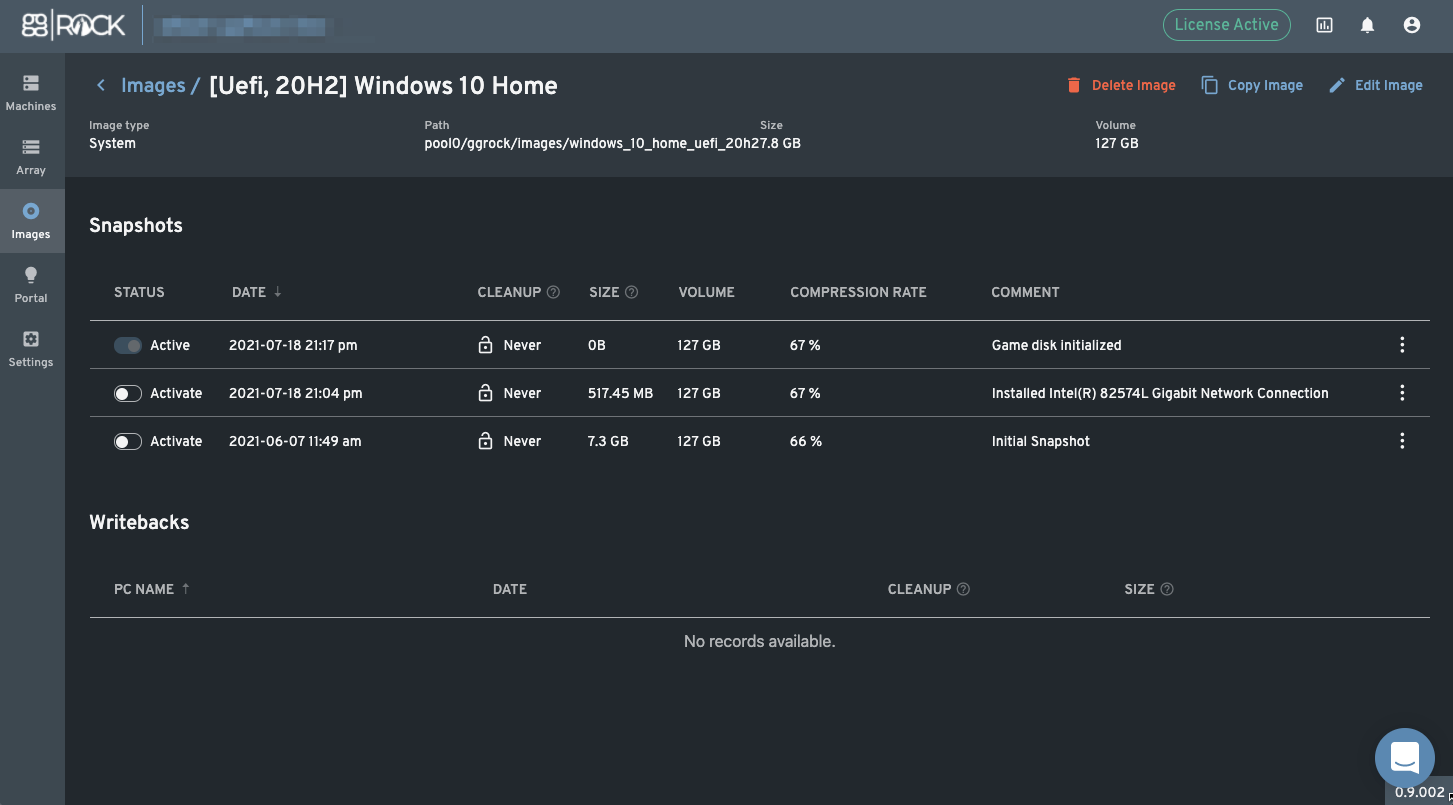
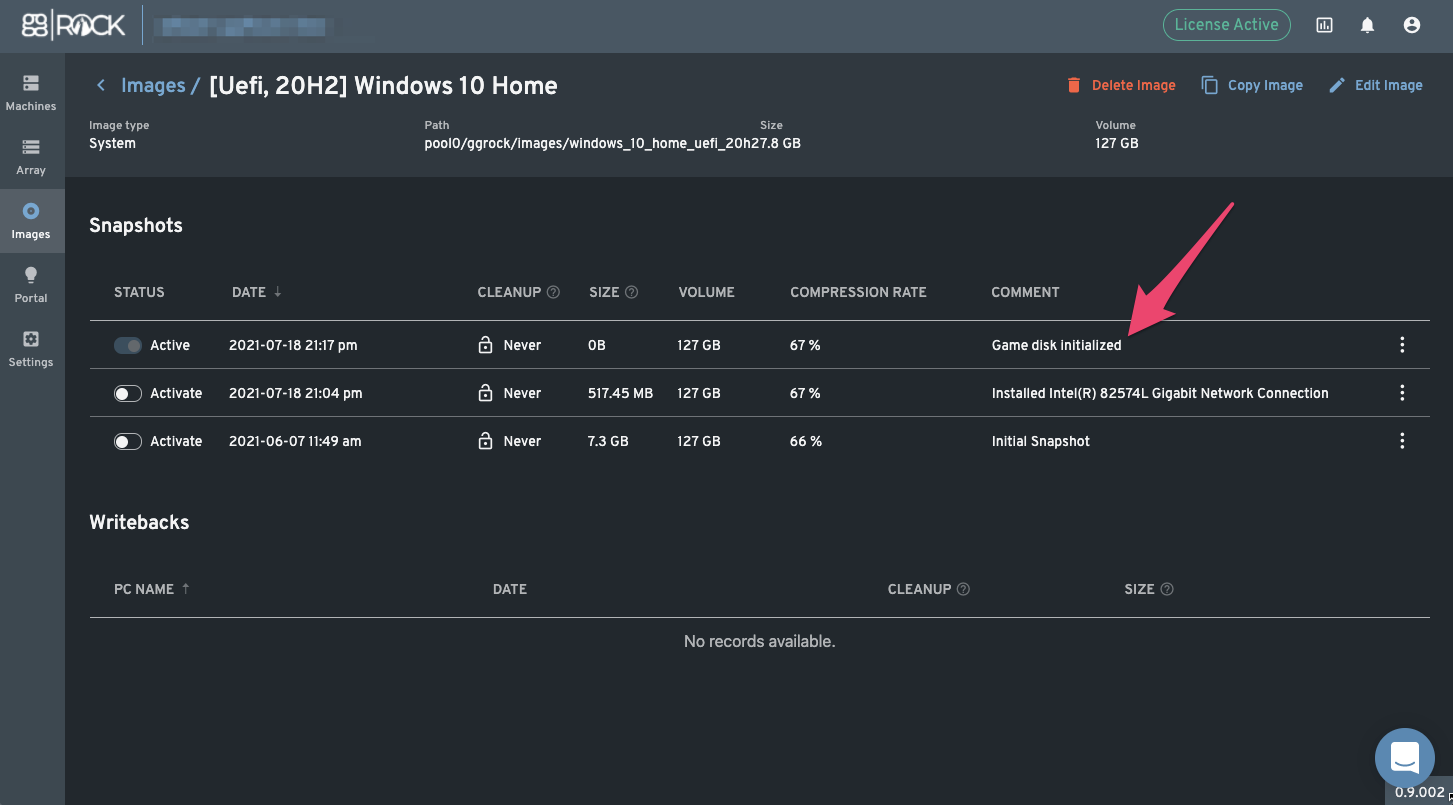
18. Confirm that the snapshot has been created for the System image.
NOTE:
Every time you apply a Writeback ggRock creates a Snapshot. Think of a writeback as the page of the book you are on, and the Snapshot is a bookmark on this page that you can return to at any point in time. You can always roll back your image to a previous Snapshot if you want to return to a previous state without the latest changes.
Here we can see our Writeback has been applied to the system image as a new Snapshot, and we can see that it is "Active". When writebacks are applied, a snapshot is automatically created and marked as active for the image(s) in question.
19. Confirm that the snapshot has been created for the Game image.
The same concepts are true for the snapshot created for the Game image. Comments become important as you create more snapshots - a descriptive comment will allow you to quickly and easily discern the changes made in a given snapshot.
NOTE:
When a snapshot is marked as active, any system that is currently powered on will be set to boot to that snapshot by default the next time it is rebooted. If a Machine was powered on while a new snapshot was created, it will remain on the old snapshot until it is rebooted.
After this step you are all done and can scale up your deployment. Once you are comfortable feel free to learn more about ggRock Administration
Note:
If you are experiencing any issues please visit our Troubleshooting article, or feel free to contact ggRock Support via the Chat Bubble at the lower-right corner of your browser.