
This article explains how to configure basic aspects of ggRock: Configure Array, import and set up Images and get Machines to boot.
At this point we assume that you have successfully completed Install Debian OS and Install ggRock steps, as well as any optional/special cases mentioned in these documents.
Phase 1. Login and set up your credentials (5 steps)
Step 1. Determine your Server IP
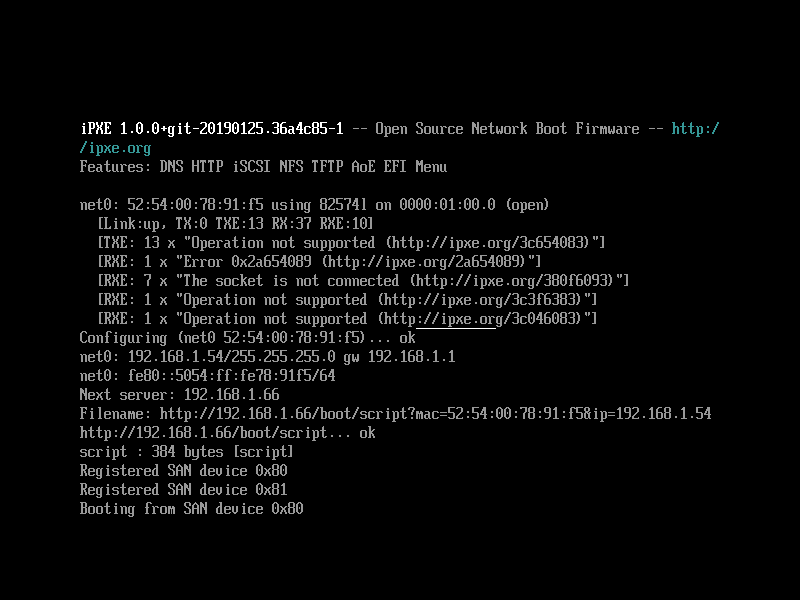
Boot up your server (or reboot it) and in the prompt you will see your Server IP. In this case it's 192.168.1.66

Step 2. Navigate to ggRock
Enter your Server IP (192.168.1.66 in our case) in a browser on any PC on the same LAN as the server. If you navigate here for the first time make sure to accept the ggRock self-signed SSL certificate, by Going to Advanced -> Proceed to 192.168.1.66 (unsafe). It is perfectly safe if you followed installation instructions.
 Step 3. Enter your credentials
During your purchase your sales manager should provide you with your ggRock credentials. Enter them in the fields provided. If you have ggLeap, this will be an account of your choosing that exists as an Employee within your ggLeap instance.
NOTE:
When synchronized with ggLeap, authentication within ggRock is tied to the first ggLeap account you sign into ggRock with that has the "Can get GG rock AuthToken" permission. It is for this reason that it is recommended to create a new ggLeap Employee Account to use as a service account for ggRock authentication. This avoids a discouraged practice of sharing a personal user account/password amongst multiple users.
1. Log into the ggLeap Web Admin, then navigate to Settings > Employees > Employees list.

2. Click the "Add employee" button.

3. Set a username and password for the account, and ensure it has the "Can get GG rock AuthToken" permission.

4. Log into the ggRock Web UI with the ggLeap Employee account you created above.

Step 4. Create new ggRock password
You will be prompted to change your password so nobody else knows it and we eliminate any dangers with the communication mediums used to send you your initial credentials.
 Step 5. Confirm login
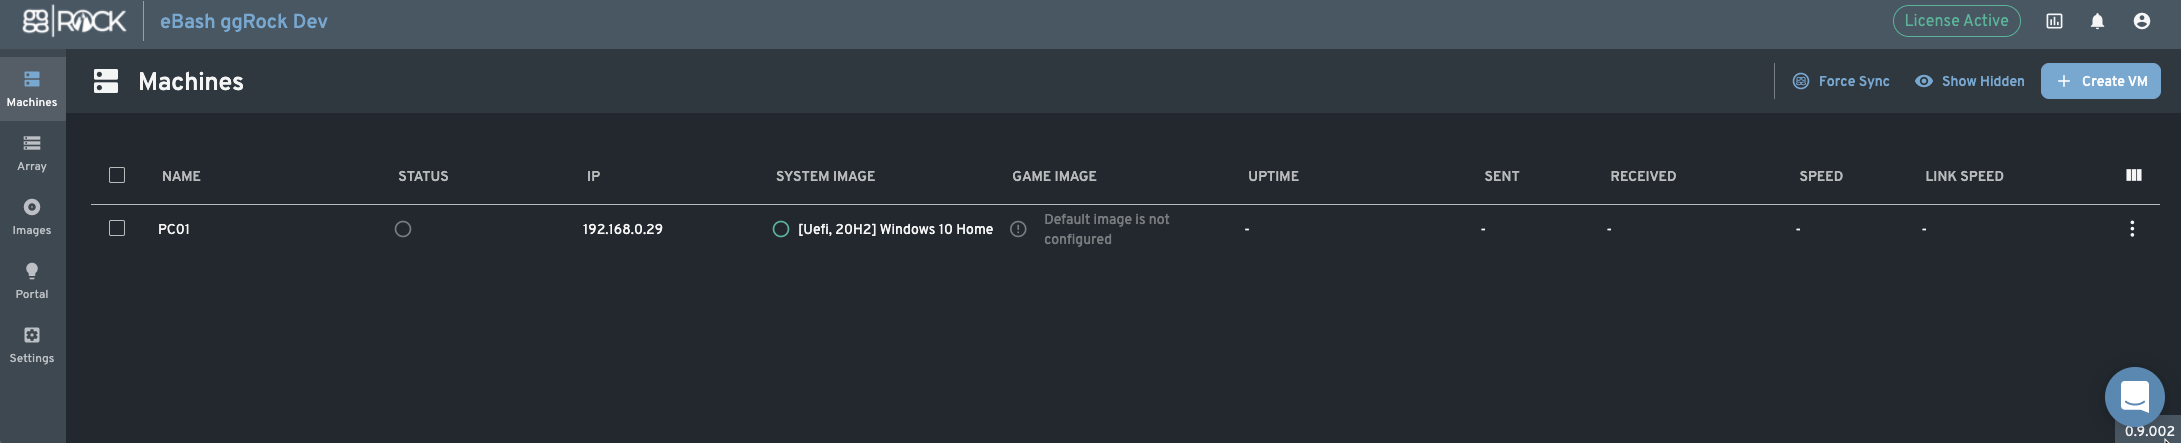
Upon successful login you should end up on Machines page with no entries.
Phase 2. Configure ggRock Array (3 steps)
Once you have logged in and created your password and arrived to the Machines section your first step is to set up ggRock Array. ggRock Array is the place where your client's (Windows) OS and Game Images will be stored.
Step 1. Navigate to Array section
Click Array navbar item
 Step 2. Initiate Array configuration
 Step 3. Familiarize yourself with ggRock Array types
ggRock Array operates as a combination of Stripes. Each Stripe can contain one or more drives - therefore having different types. All Stripes are set as parallel to each other, so Array's size is the combination of all Stripes size. Array Read speed is also, roughly, a sum of all Stripes read speeds.
Therefore, by default, ggRock Array is not redundant. If you want to achieve redundancy you will have to make sure that each of your Stripes is redundant (Raid 1/10, Raid 5, 6 or 7)
ggRock team recommends you to always strive to set up RAID10 Arrays, as they are both performant and redundant.
You can learn more about the ways you can Manage ggRock Array in ggRock Administration.
Here are shortcuts to the different "RAID-equivalent" configurations with ggRock:
-
RAID0
-
RAID1
-
RAID10
-
RAID5, 50, 6, 60, 7, 70
You can not add the OS drive to your Array. Meaning, the drive that you have Debian installed on is unusable for the purpose of adding to the ggRock Array.
Step 3.1 Set up RAID0 (Single Drive)
The basic RAID0 (Striped) setup looks like two Stripes of Single Disk type.
You can add more Stripes if you want to add more than two Drives
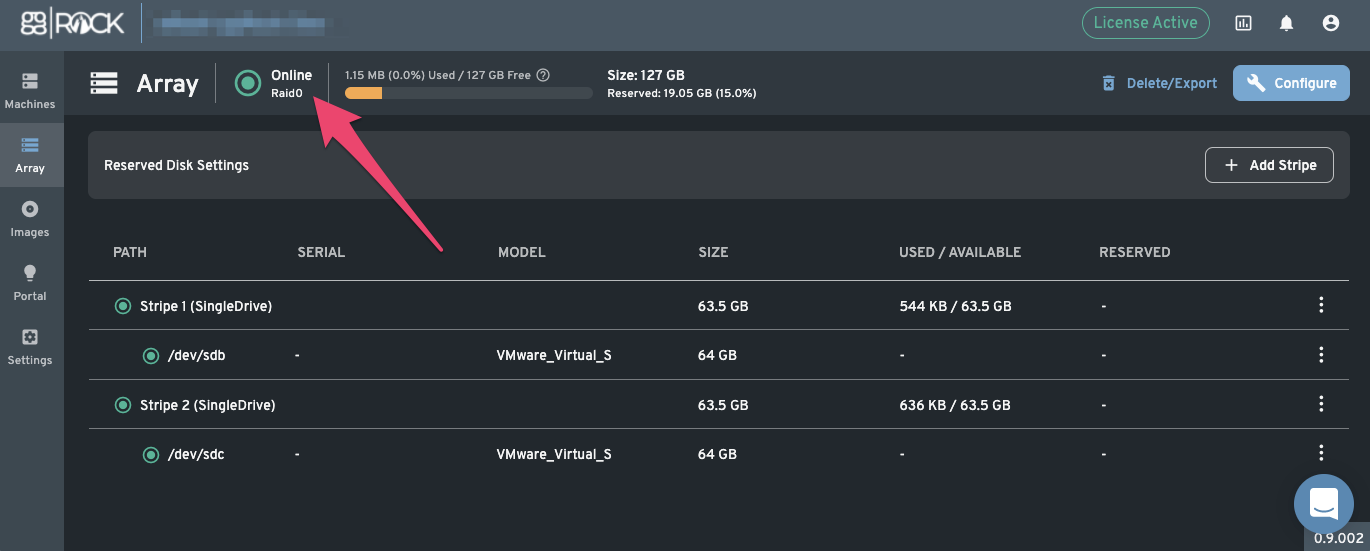
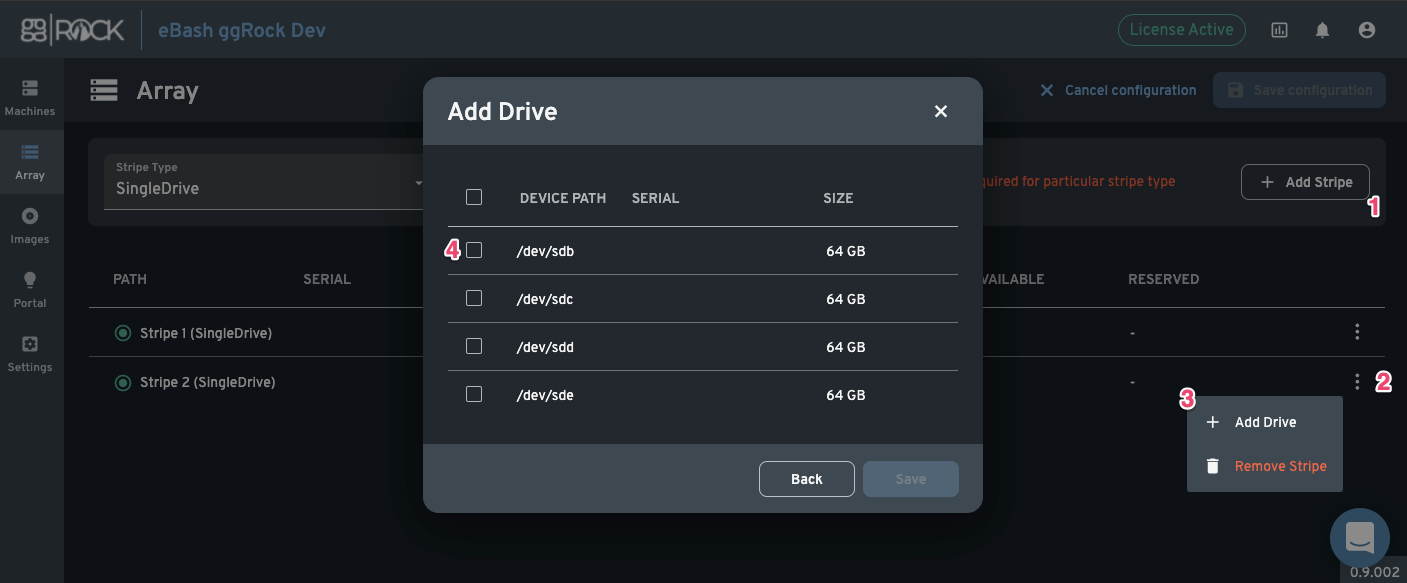
To configure RAID0 we need to create two Stripes, and add one Drive to each of them. Refer to the image below to see how you can do that for one Stripe and repeat for the second.
Step 3.2. Set up RAID1 (Mirrored)
The basic RAID1 (Mirrored) setup looks like one Stripe of Mirror type with two Drives.
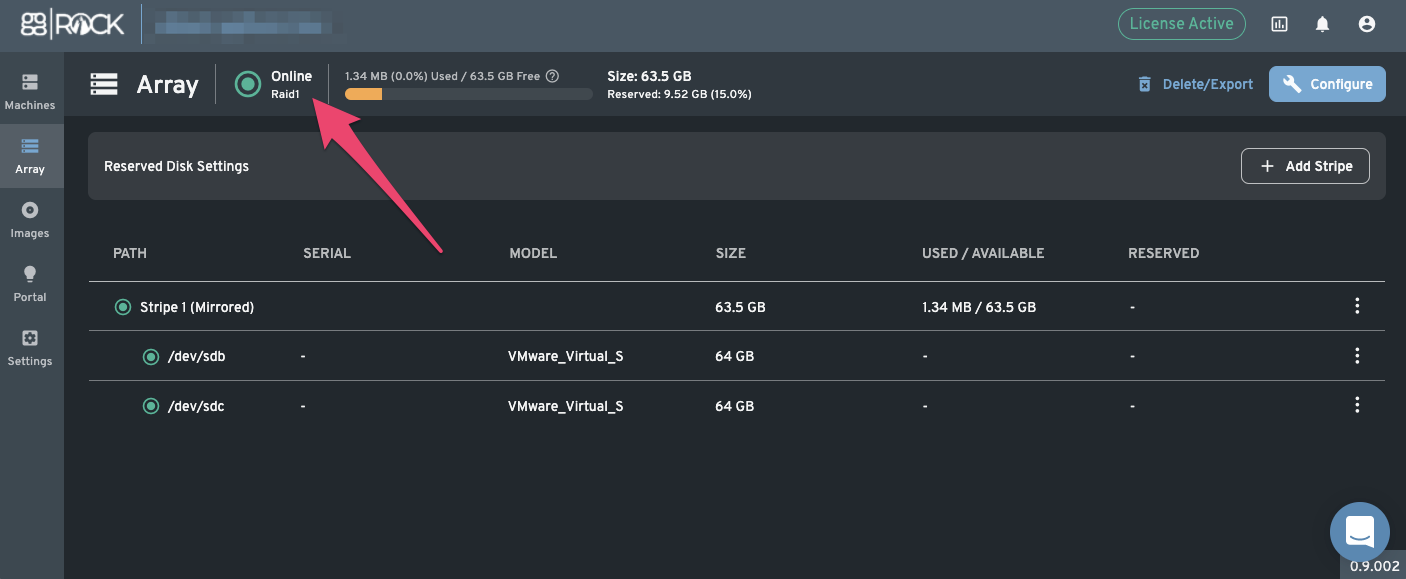
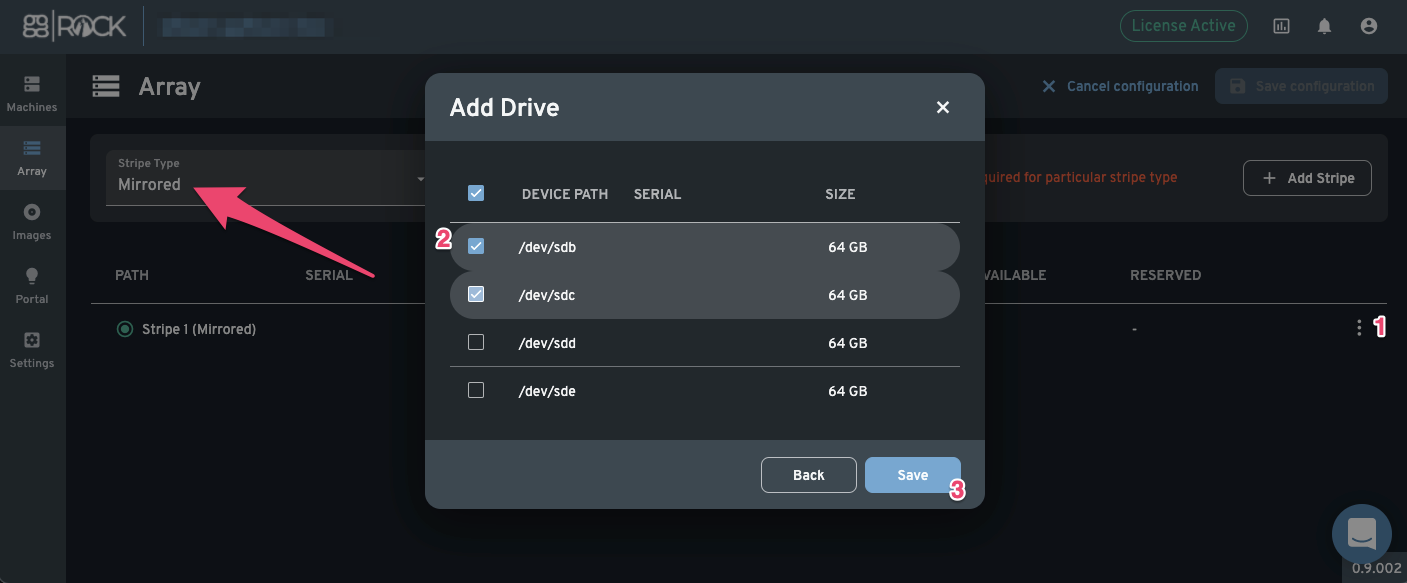
To configure RAID1 we need to set Stripe Type to Mirrored and add two Drives to it.
Step 3.3. Set up RAID10 (Striped Mirror)
The basic RAID10 (Striped Mirror) setup looks like two stripes with two Drives in each.
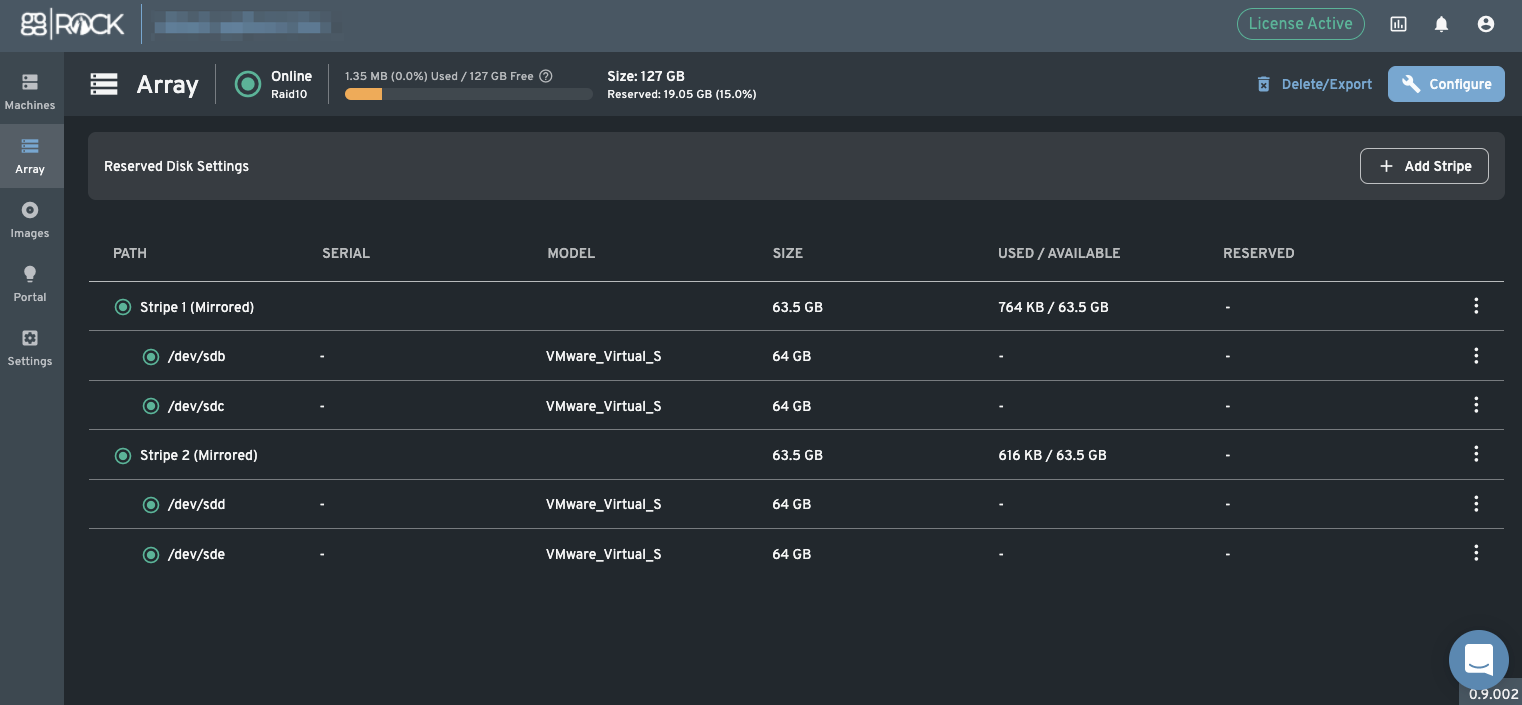
Setting up RAID10 is similar to Step 3.2 Set up RAID1, but repeated twice. You can even add additional Stripe with two Drives to an existing RAID1 Array.
Step 3.4. Set up RAID5, 50, 6, 60, 7, 70 (Parity redundant)
RAID5, 6 and 7 are Array types with Parity drives, where you can lose one, two or three drives accordingly. There are downsides to it - recalculation after a lost drive is very difficult and long, and puts additional stress on the drives. These RAID types also don't give better Write performance compared to RAID1/RAID10.
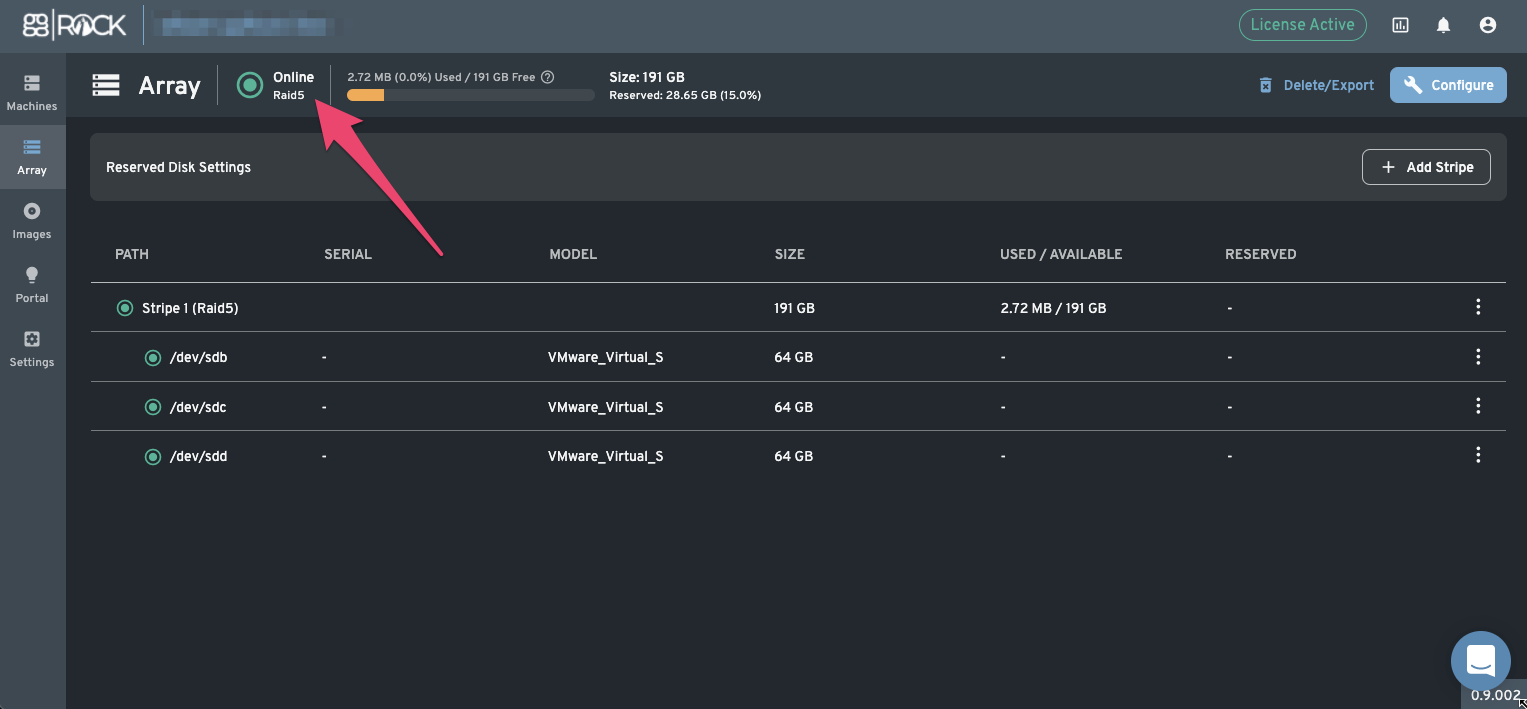
If you want to set up RAID50, 60 or 80 - Simply add another Stripe. It will have the same type, and you will need to just add the Drives to it.
Phase 3. Configure Client Machines for Diskless (PXE) Boot
For the purposes of this manual we assume that we're setting up Client Machines in UEFI mode. Please take notice that all motherboard BIOS'es are different and consult the manual provided by the manufacturer on the website. For now you may elect to perform this process only on the system you will be setting up your initial System Image on, but in the end every system must be configured in the same manner.
We will be using ASRock X570 Taichi as the reference
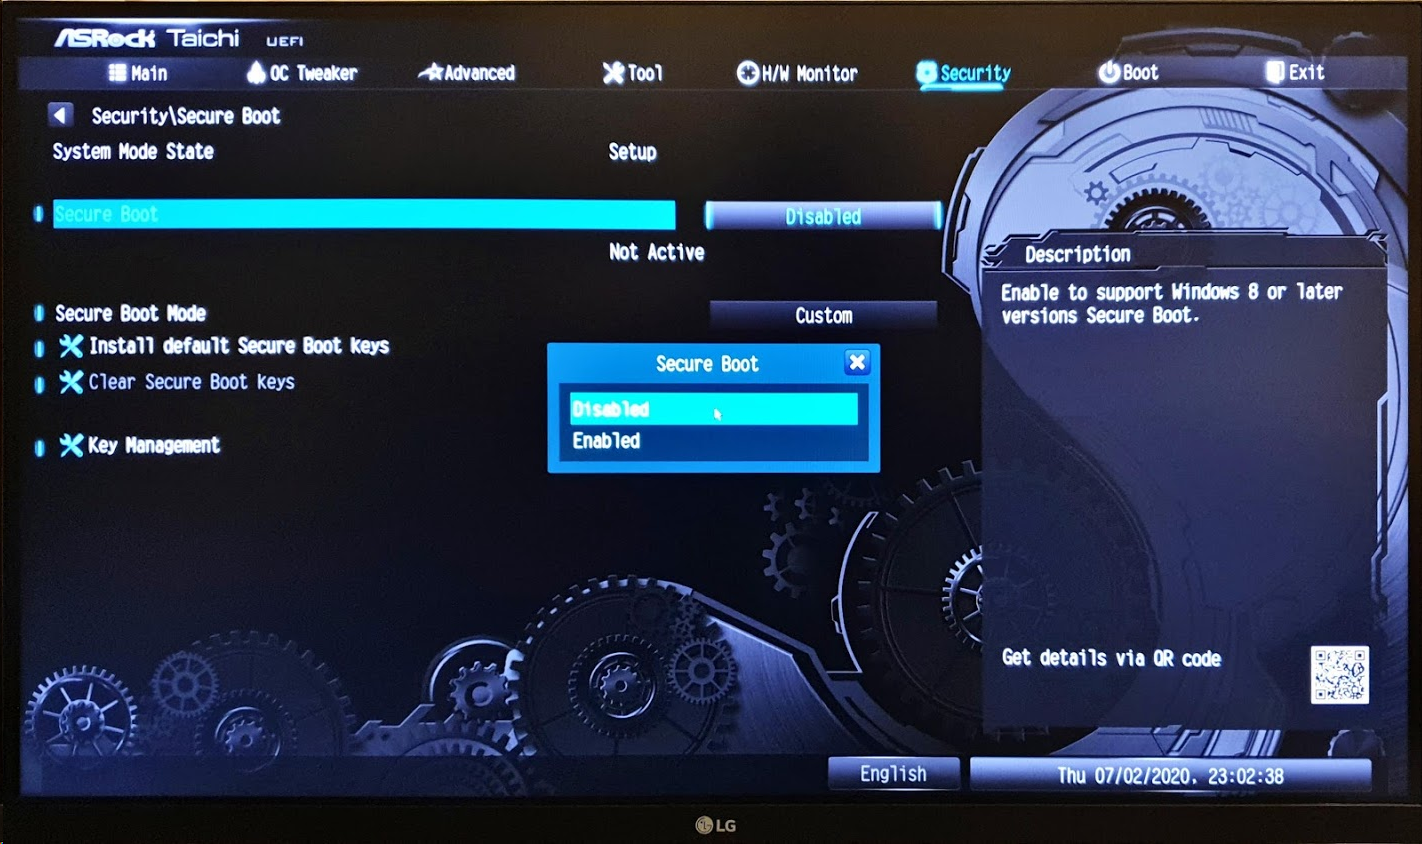
Step 1. Disable Secure Boot
Since we are using UEFI we need to disable Secure boot. If you can't disable it - first remove all keys created below. This setting is usually under Security tab.
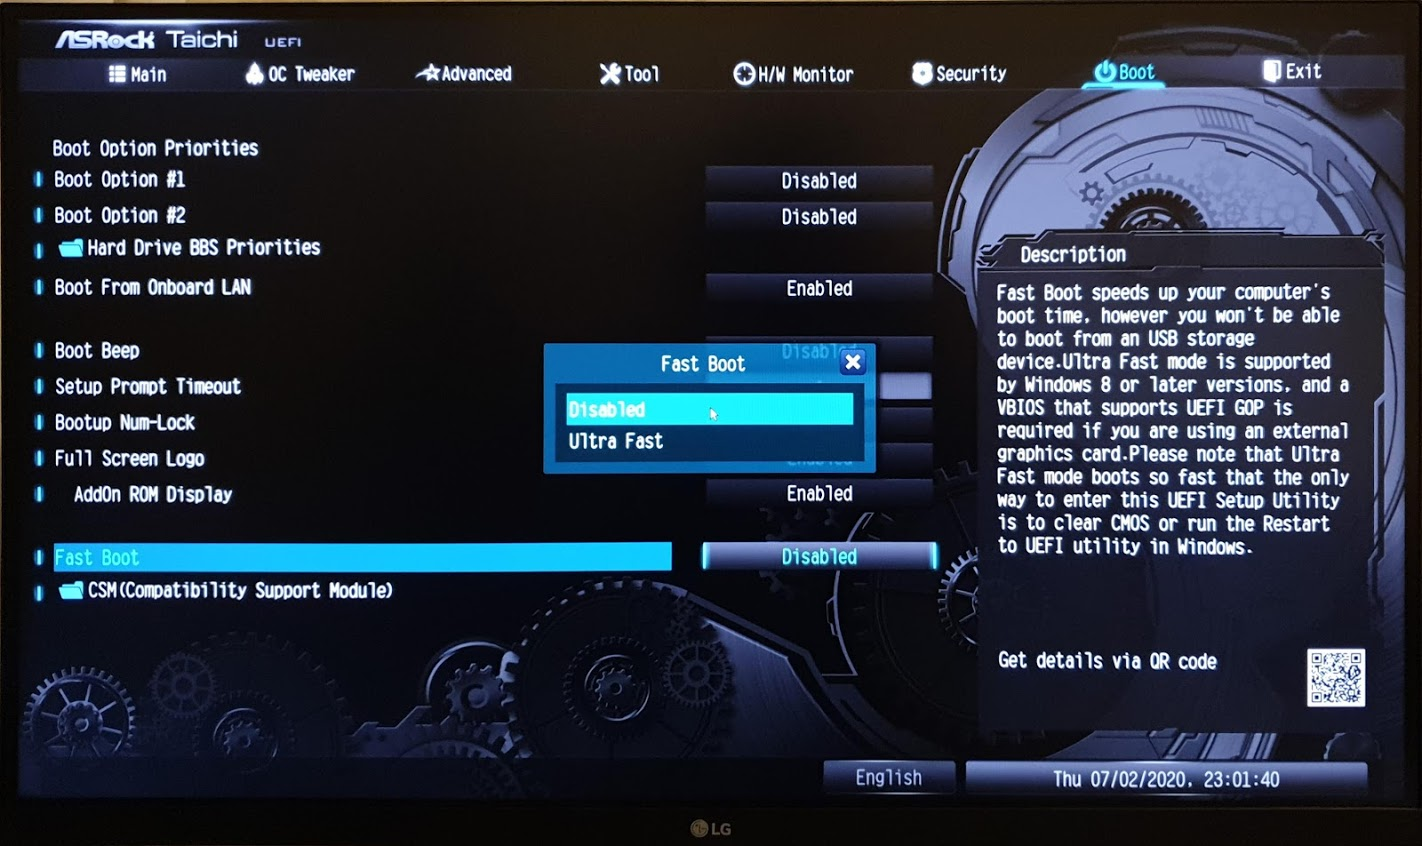
Step 2. Disable Fast Boot
Make sure that Fast Boot is Disabled. It's usually under Boot tab
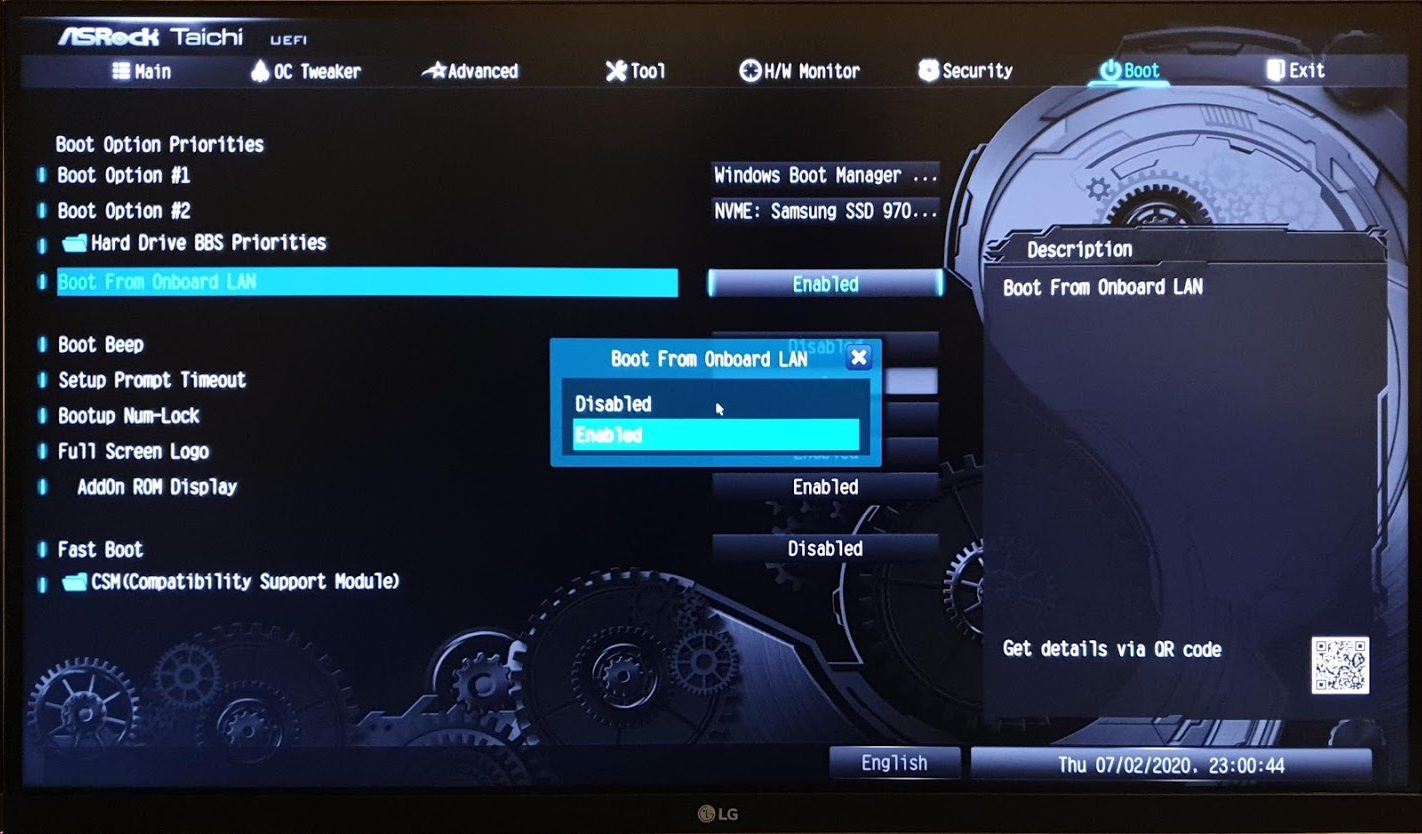
Step 3. Enable Boot from Onboard LAN
In order to let us chose Network PXE boot we'll need to enable this option. Some motherboards might force you to save changes and restart on this step in order to see the Network options.
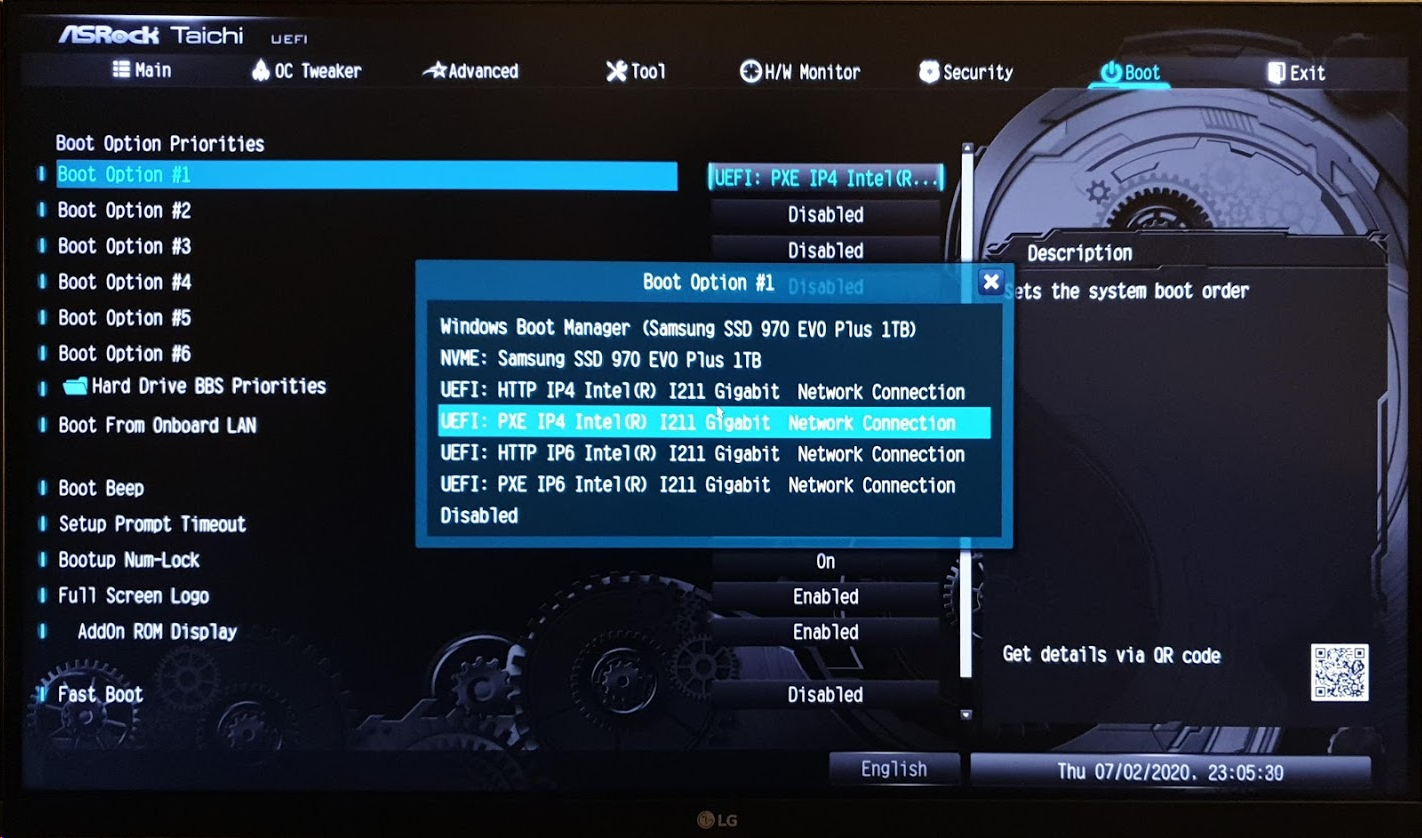
Step 4. Enable Network Boot over PXE IPv4
After enabling Boot From LAN you should be able to enable LAN options. Make sure that you are only leaving IPv4 PXE option, and only for your wired LAN (not WiFi card), as well as disabling all other boot options for good measure.
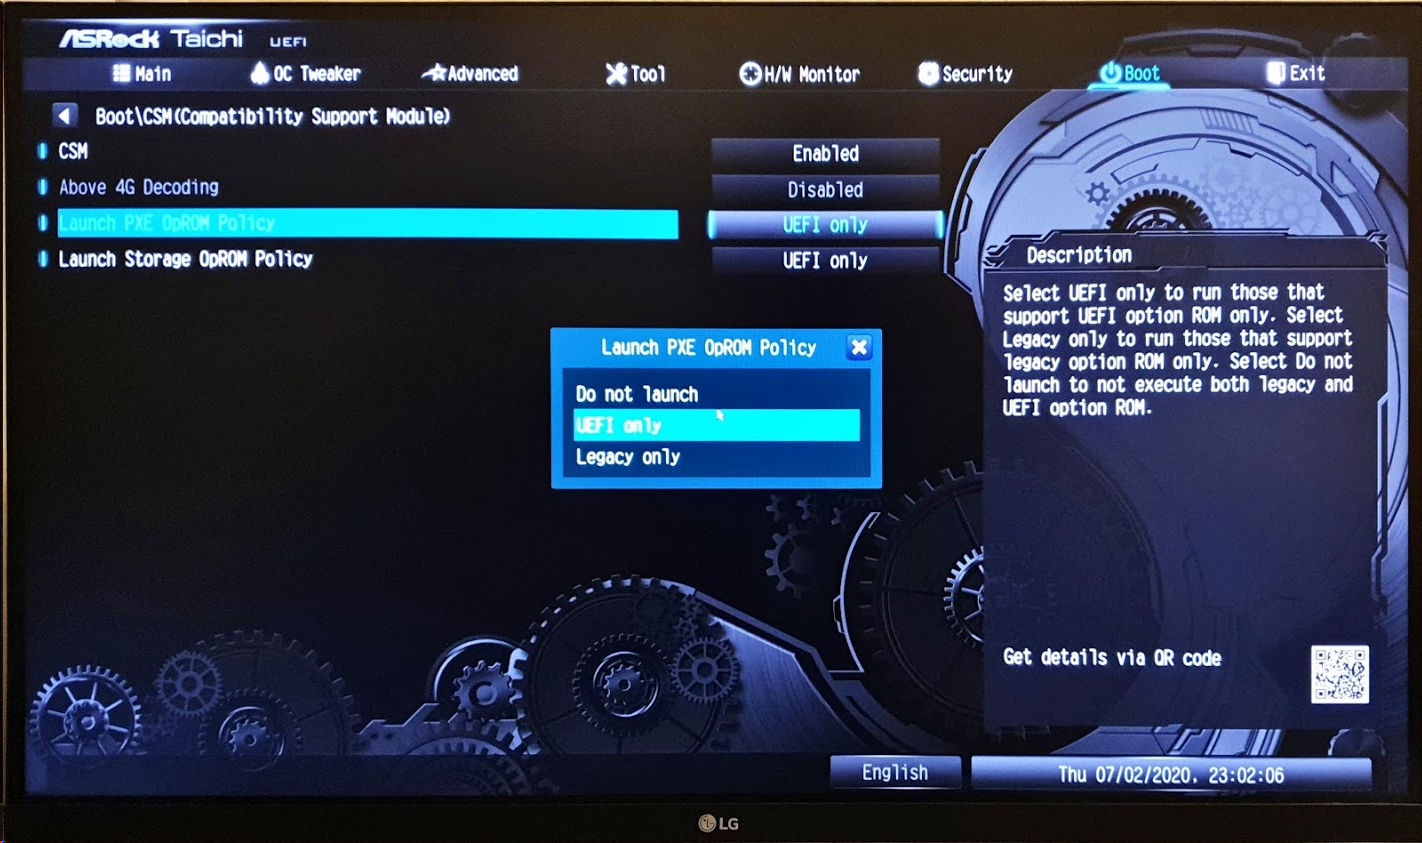
Step 5. Set Network UEFI mode for Network boot
We need to make sure that when booting over Network out Client expects UEFI mode. This is usually found under Boot -> CSM (Compatibility Support Module).
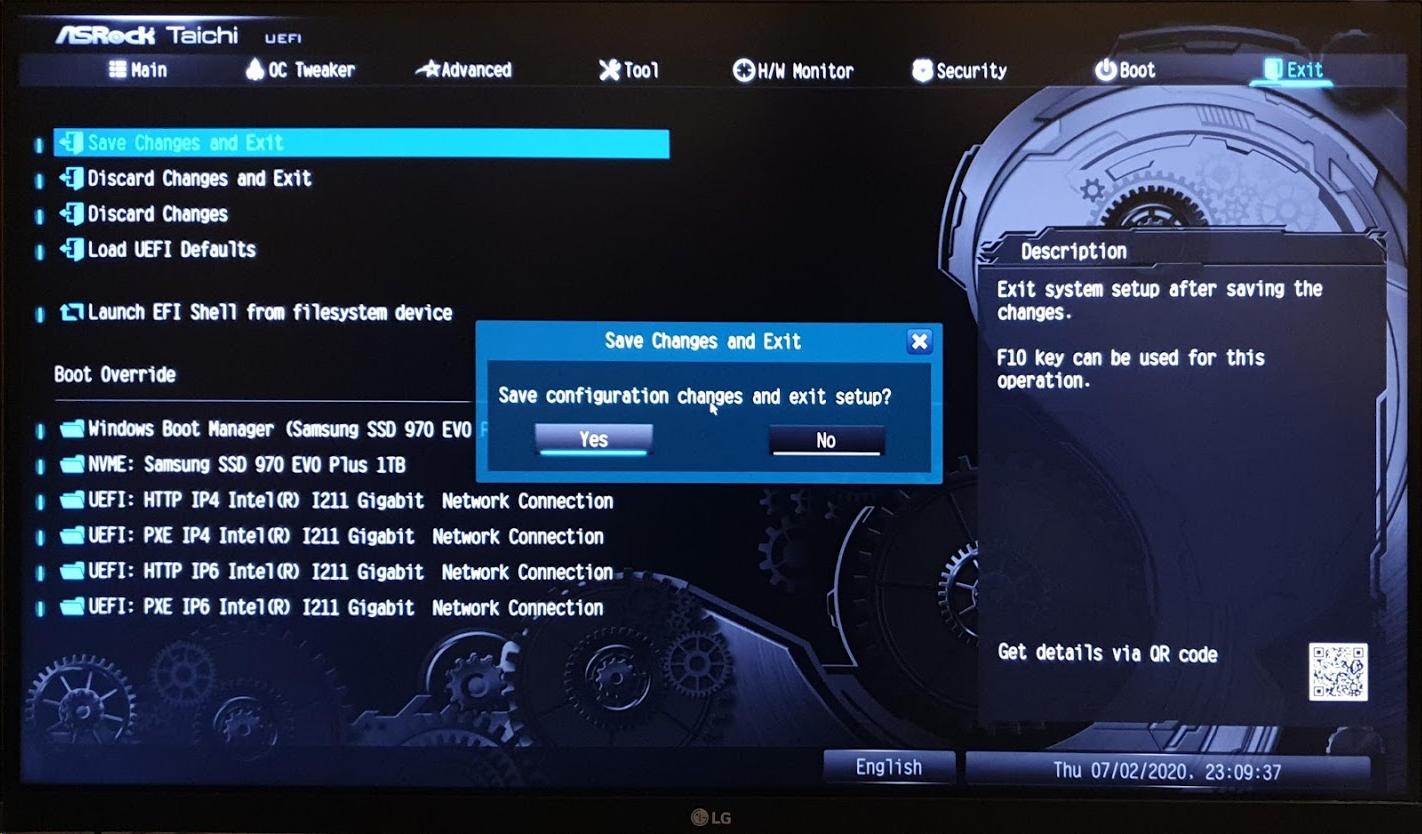
Step 6. Save Changes and Exit
Finally, your machine is all ready to go and you can Save Changes and Exit. Feel free to repeat these 7 steps for all other Machines you plan on using with ggRock.
Phase 4. Create System Image
The next step is to create your System Image.
Here you will have two choices, you may utilize the Seamless Boot process to create your image, OR you may utilize the legacy ggRock Image Creation Tool process.
It is recommended to use the Seamless Boot process to create your System Image because it is a much faster and more efficient process with fewer steps.
For a preview of the Seamless Boot Process, please see the following video clip:
Creating a System Image Using the ggRock Seamless Boot Process
Creating a System Image Using the ggRock Image Creation Tool (Legacy Process)
Phase 5. Final steps, real boot and checks
We will be verifying that our Client Machine boots, creating and passing through Game drive and applying writebacks to save changes.
Step 1. Boot your Client Machine
After completing final steps of Phases 3 and 4 you should be able to power on your Machine and see the following prompt, followed by Windows logo and login screens.
Step 2. Confirm Machine presence
Once your Machine boots
Step 3. Determine available Array space
Before we will create Game Image we need to ascertain how large we can make it. It's a good rule to leave (Number of Machines * 10) + 15% total capacity of free space in the Array, rounded down for reserve. Let's assume that we want to run 10 Machines.
Therefore, in our case, we can allocate 50.62GB for a Game Image

Bear in mind that you CAN NOT reduce your Image Volume. You can only increase it in the future. Therefore, having some margin to grow and now occupy all the space in the Array is considered a best practice.
Step 4. Create Game Image
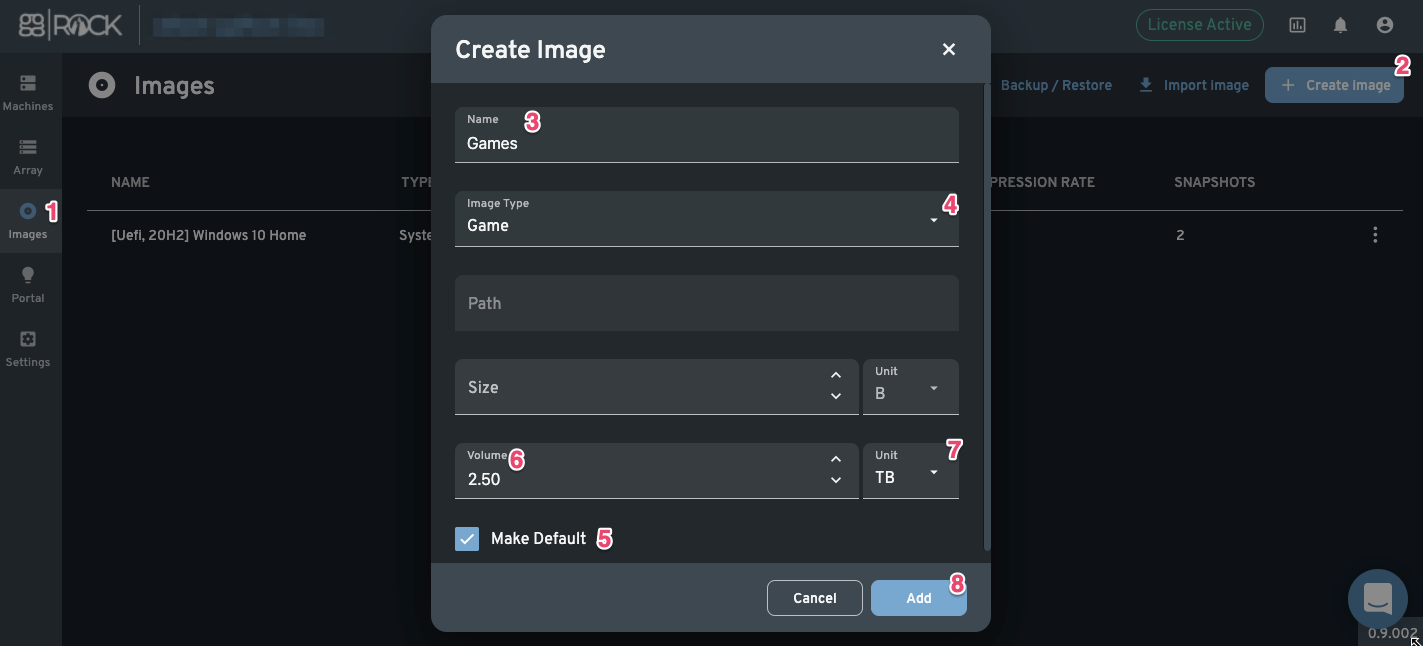
Go to Images tab, select Create Image, then give your Image a name, set Type to Game, make it Default, set the Volume calculated in Step 3. Determine available Array space and finally click Add.
Step 5. Shut Down the Machine
Step 6. Add Game Image to Machine
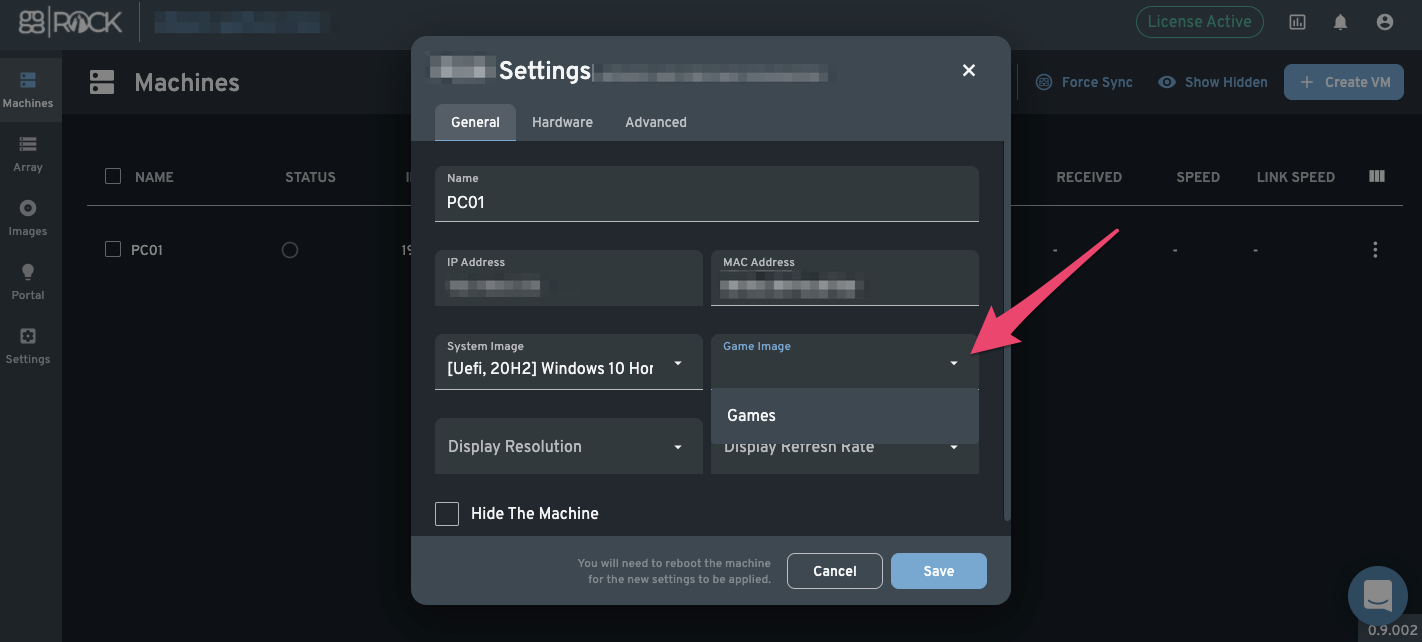
Since our Machine was initially created before we made Game Image default - it will not retroactively be added. We need to navigate to Machines -> Machine Menu -> Settings and set the Game Image, then Save.
Step 7. Boot the Machine and Open Disk Manager Snap-in
Power the Machine back up.
Open the Start Menu and start typing part, then select Create and format hard disk partitions.

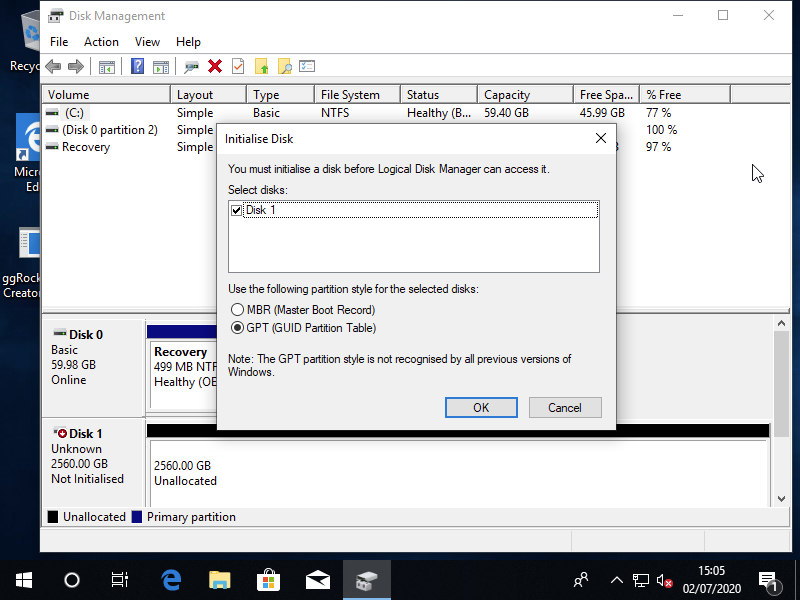
Step 8. Initialize Game Disk
Most likely Disk Management utility will present you with a modal to initialize the new disk. Leave GPT selected and click the OK button.
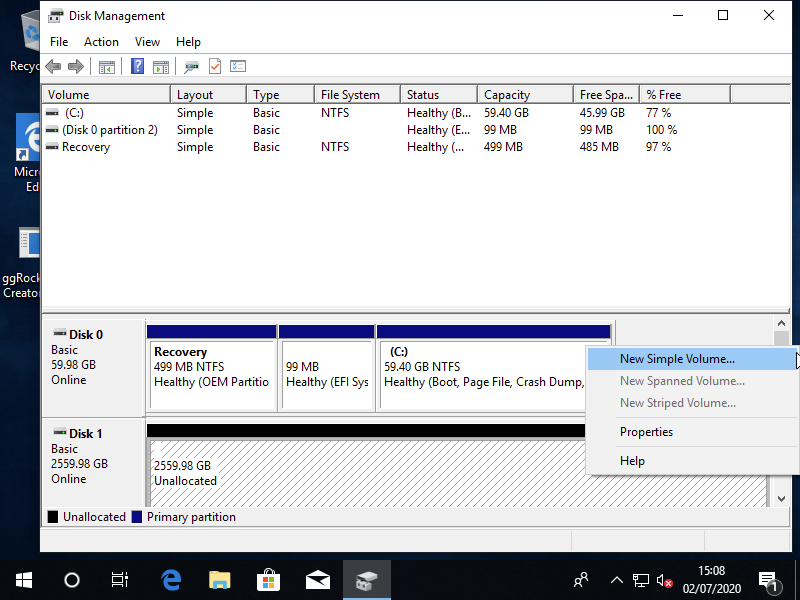
Step 9. Create new Volume
Now Right Click on the Unallocated space and select New Simple Volume from the context menu.
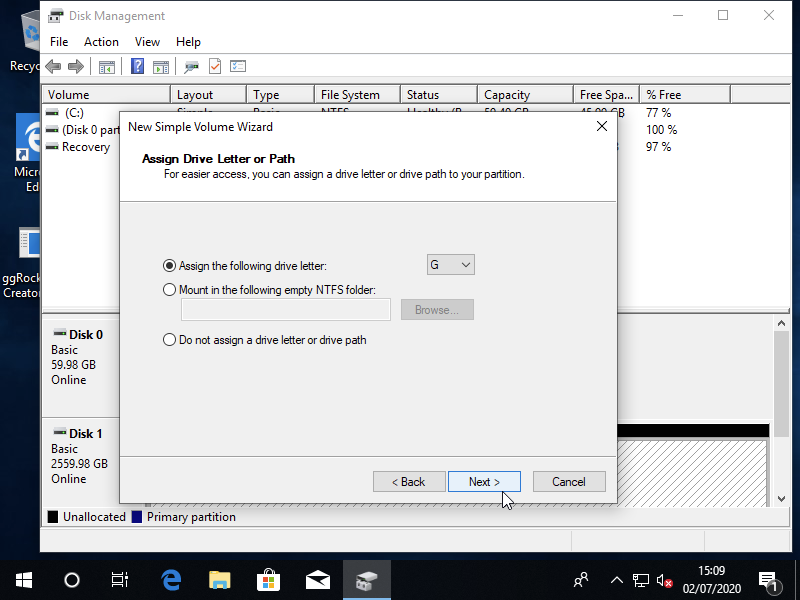
Step 10. Complete first steps and chose drive letter
Start the Wizard, leave the volume size as default (maximum allocation), press Next, then Choose a drive letter for your DIsk. We have chosen G. Click the Next button after you are done.
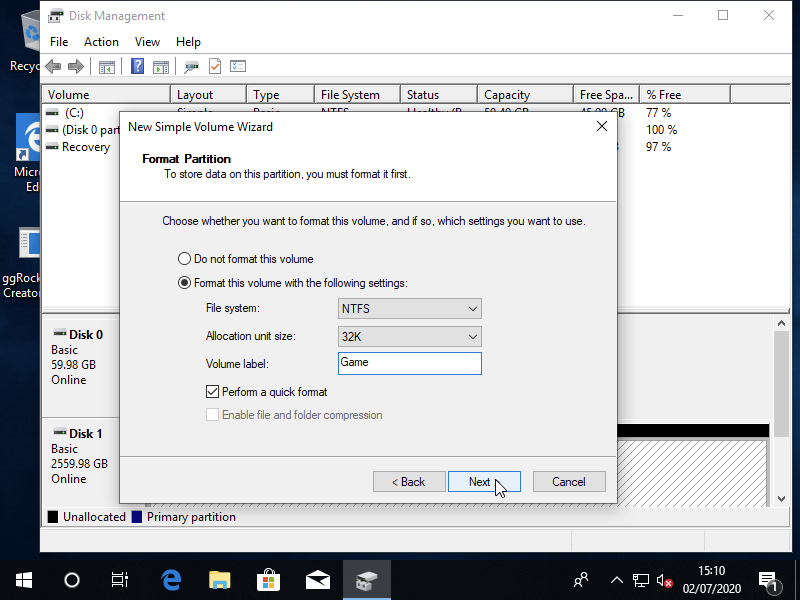
Step 11. Select file system and unit size
Select the following formatting options: NTFS, 32K allocation unit, “Perform a quick format”. Volume Label can be anything, we chose “Games”.
Allocation Unit should be set to 32K, no exceptions
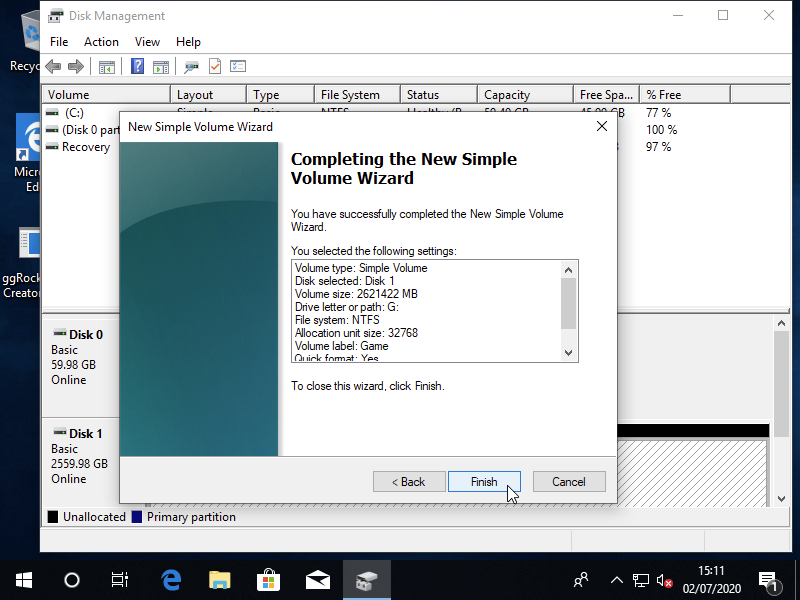
Step 12. Review the Volume
Review your new Volume and press Finish.
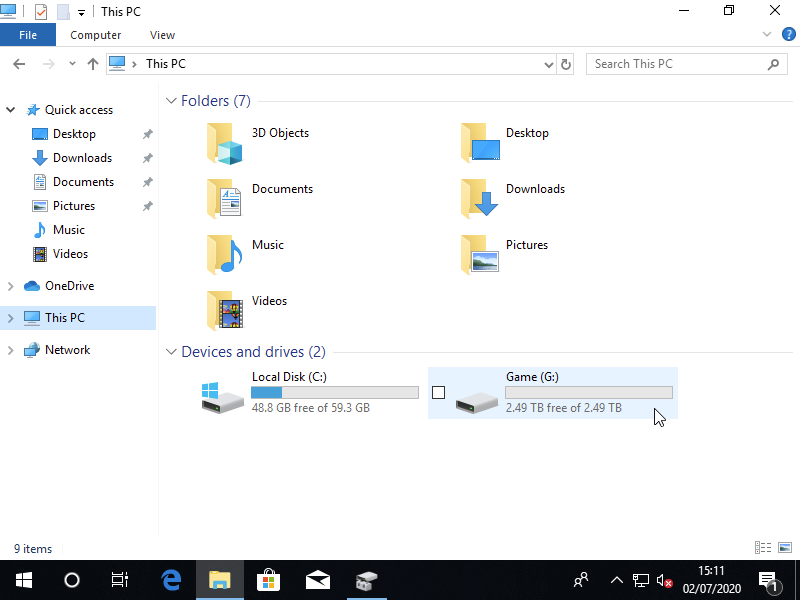
Step 13. Confirm that Game drive was initialized
Now navigate to File Explorer and confirm that the Game drive is present and available.
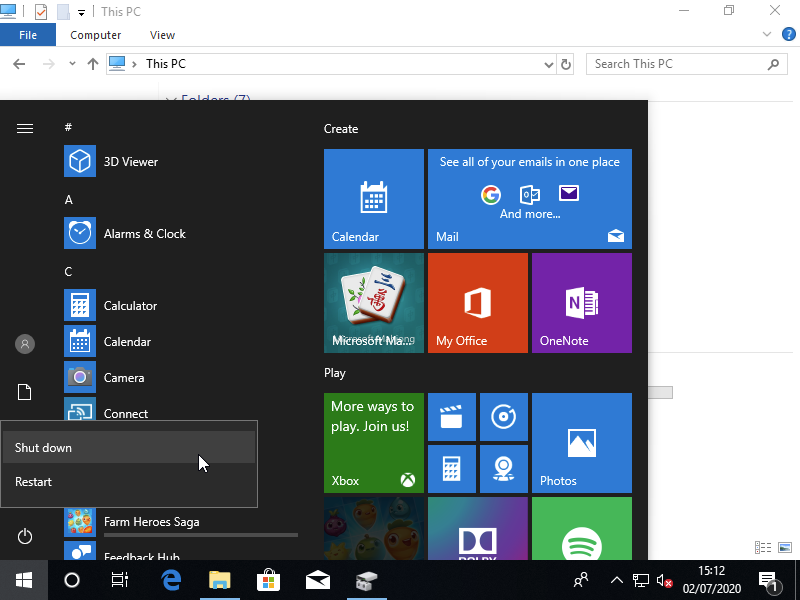
Step 14. Shut down the PC
Shut down the PC.
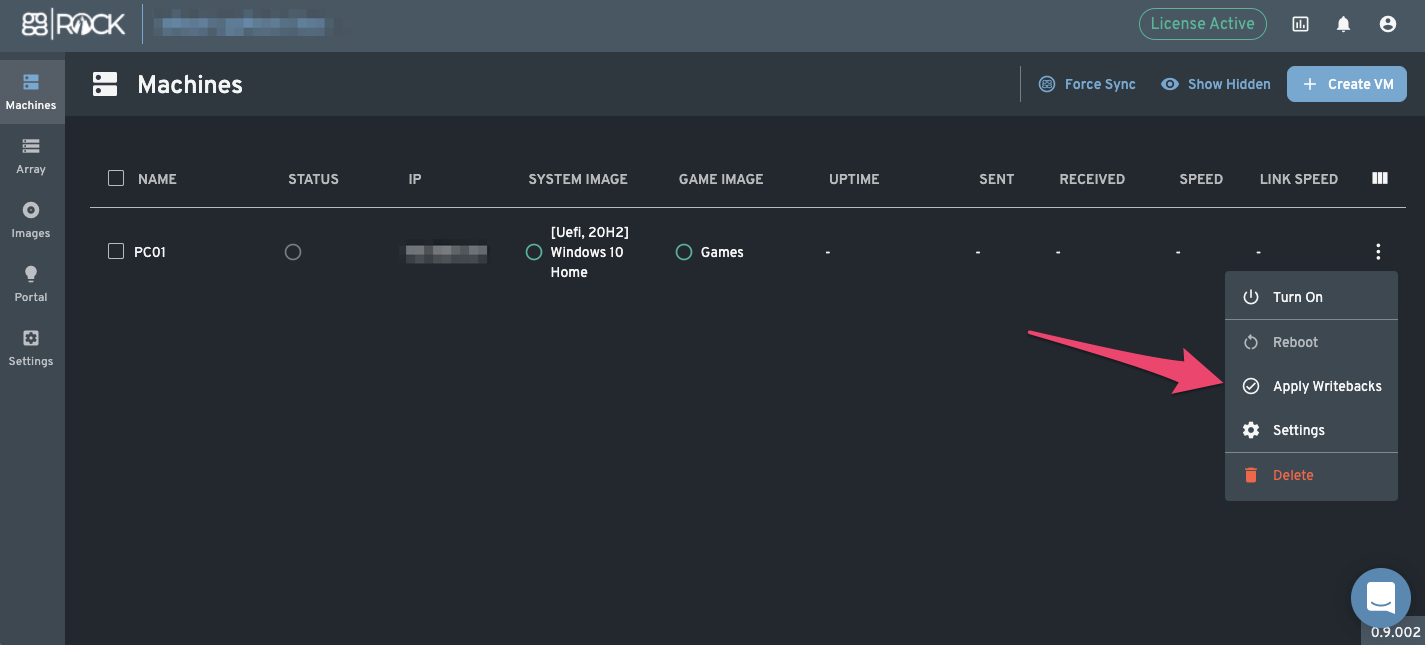
Step 15. Apply Writebacks
ggRock saves changes you have made to your Machines as Writebacks. Each Image (OS, Game) has it's own Writebacks. When you have made certain changes to the Machine that you want to keep you need to Apply Writeback from that Machine.
Here, we are going to apply both writebacks with a shortcut in Machine Menu.
Navigate back to Machines -> Machine Menu -> Apply Writebacks
If you want to learn more about Writebacks visit ggRock Administration Manual, Machines - Saving your changes
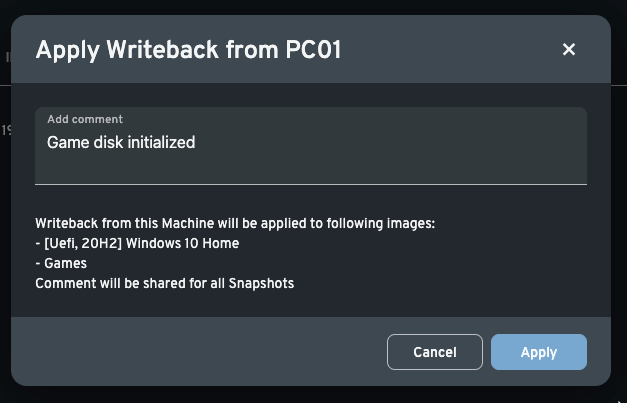
Step 16. Set Writebacks name
Set a recognizable name for the Writebacks and Apply, this name will be shared by both Writebacks - for OS and Game Images alike.
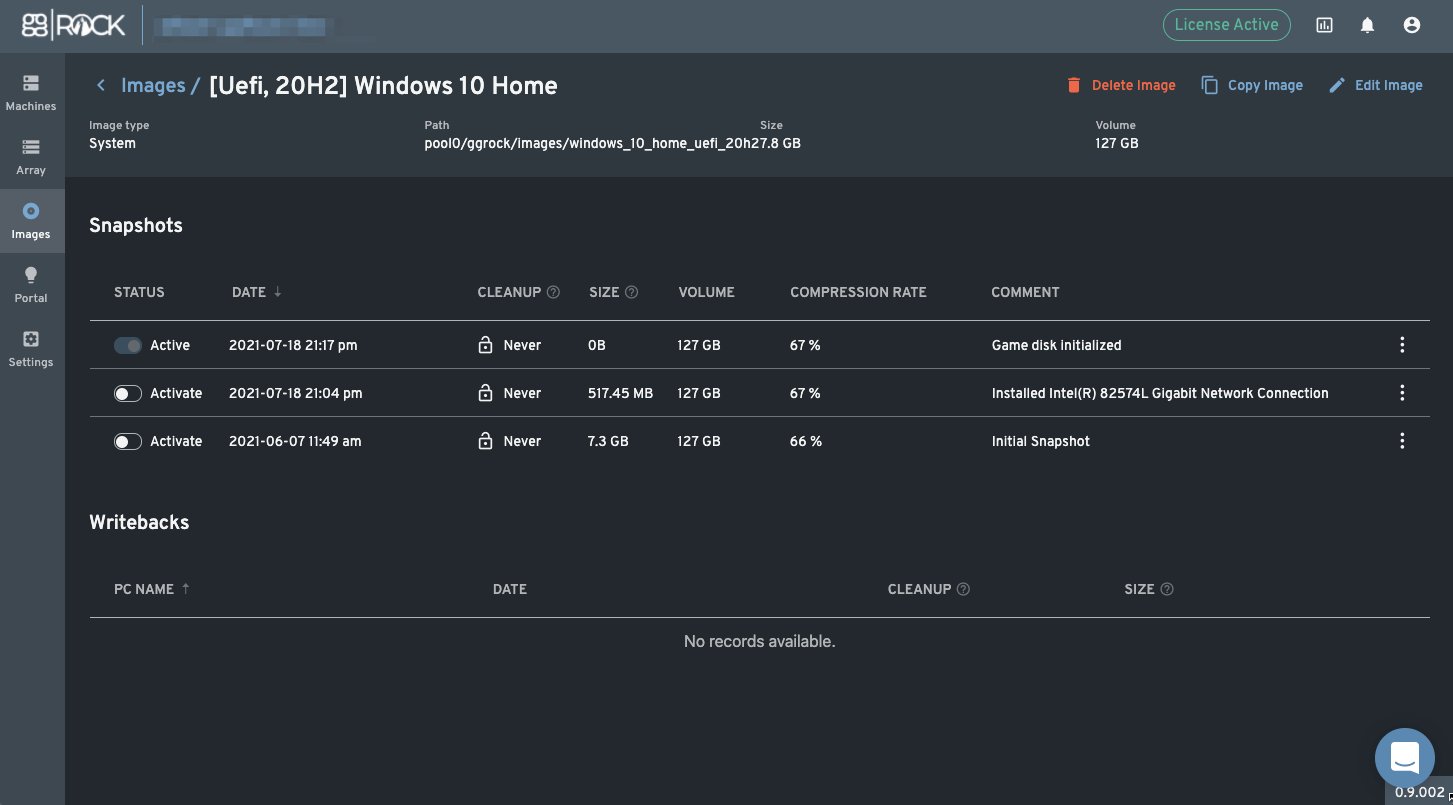
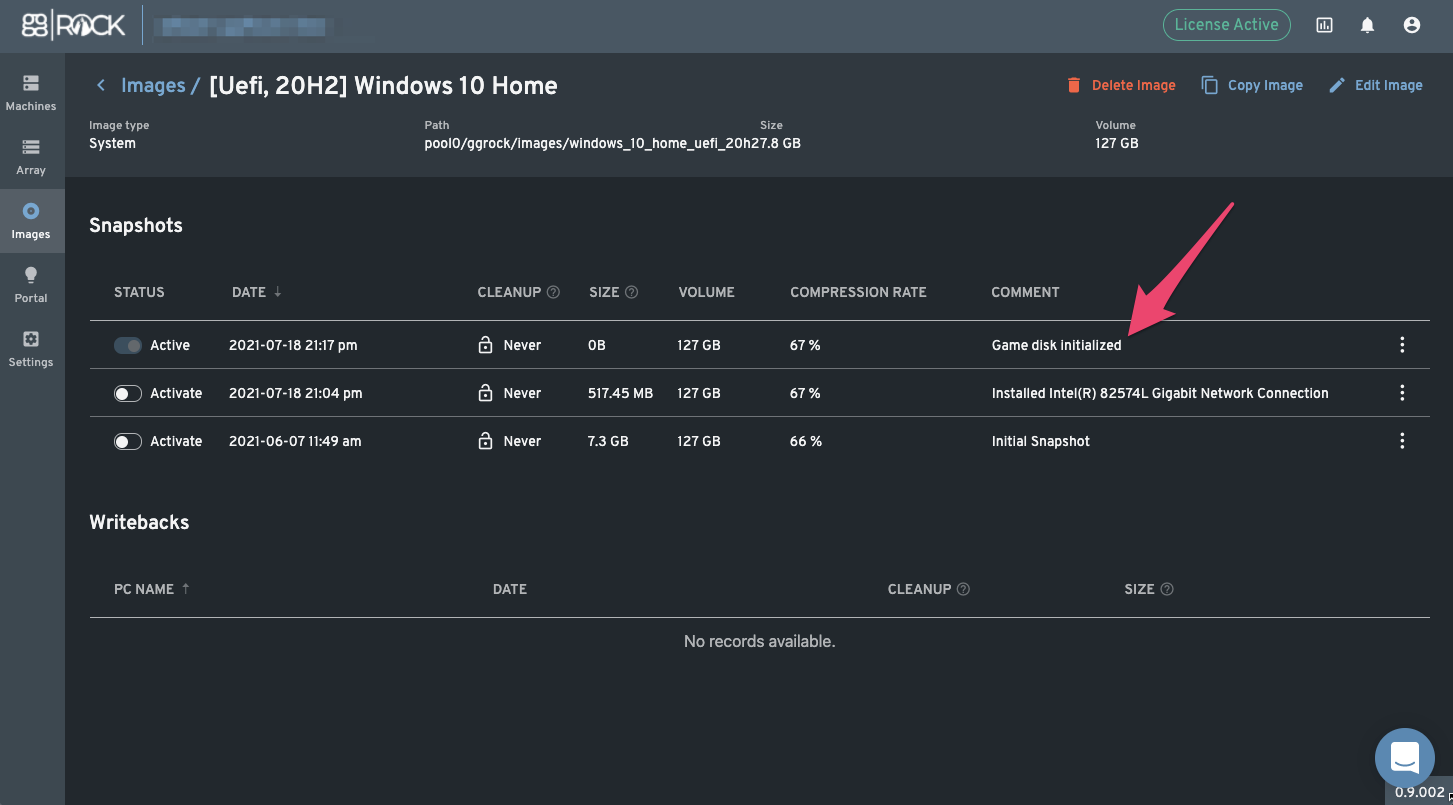
Step 17.1 Confirm OS Image Snapshot
Every time you apply a Writeback ggRock creates a Snapshot. Snapshot is a sort of a "checkpoint" or "recovery point". You can always roll back your image to a previous Snapshot if you want to return to a previous state without the latest changes.
Here we can see our Writeback applied as a new Snapshot, and we can see that it's Activated. And Writeback applied automatically creates and activates a Snapshot.
Step 17.2 Confirm Game Image Snapshot
You can see a repeating situation with the Game Image Snapshot. You can always see the Comment and quickly grasp the changes that this Snapshot brings. Any snapshot that is Activated will be the base for Machines that boot going forward. Any Machines launched before that Snapshot was Activated will use old Snapshot until next restart.
After this step you are all done and can scale up your deployment. Once you are comfortable feel free to learn more about ggRock Administration
If you are experiencing any issues please visit our Troubleshooting article.