
This article aims to help users set up their ggRock Virtual Machines (VMs) as well as manage and operate them
This functionality allows you to create Virtual Machines running based on your existing ggRock Images. This gives you the ability to manipulate the Images remotely for any purposes.
Main application that we see for the centers is to update games remotely, with no need to enable any client Machines, all from the comfort of the web browser accessible from anywhere with no special software.
Enable Virtual Machines
Step 1. Check if Virtual Machines are already enabled
If you are installing ggRock after version 0.1.537 then you should have VM capability available right away. It will be apparent by the presence of Create VM button as shown below:

Step 2. Check the prerequisites
Make sure that you have:
-
Virtual Machines are not already enabled
-
Enabled Virtualization in server BIOS
-
Configured Static IP as per this manual
!Warning!
Do NOT enable Virtual Machines without prerequisites above confirmed. Only once you've confirmed this, you can initiate Virtual Machines configuration. It should be instantaneous and once the page refreshes (refresh it if it doesn’t after 5 seconds) - you should be able to Create VMs. Make sure to enable VMs with no Client Machines running, as the ones that do will be forcefully disconnected.
Step 3. Enable Virtual Machines
Follow the steps below, and ensure that any other (physical or virtual) Machines are shut down.
 Create a Virtual Machine
To create a Virtual Machine, make sure they are enabled as per Enabling Machines section. After that’s done, you should be able to see Create VM action item in your Machines section
 After initiating VM creation you will be presented with a following modal
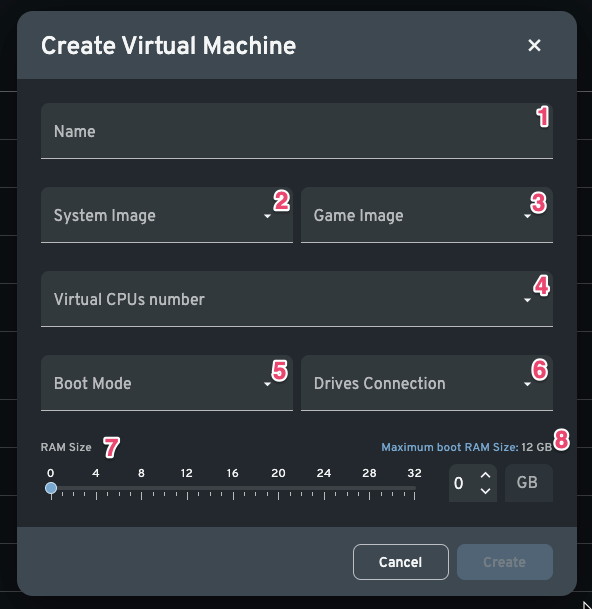 Detailing the settings above:
-
Name of the Virtual Machine. It's required
-
System image selector. Allows user to select the OS Image to be used on the VM
-
Game image selector. Allows user to select the Game Image to be used on the VM
-
Virtual CPUs number. Minimum recommended value is 2 vCPUs
How many vCPUs you want to dedicate to the VM. Usually one vCPU consumes one thread on the server -
Boot mode, options - Legacy, UEFI
- Select Legacy if your OS image was created for Client Machines using Legacy PXE Boot BIOS setting
- Select UEFI for the machines with UEFI PXE Boot BIOS setting -
Drives connection, options - Local Drives, Network
- Select Local Drives if you want top speeds and if Network option does not work. This will be connected directly to the Images on the Array on the server with no network bottlenecks or overhead
- Select Network if you want to troubleshoot any issues with your Client Machines booting, drivers issues or just generally do a sanity check on OS Image correct operations. If VM over Network works with a given OS Image - then it's most likely set up properly -
RAM Size, slider from 0 to 32 GB. Minimum recommended value is 4GB
This setting controls the amount of RAM available to a given VM -
Maximum boot RAM Size. This setting limits the amount of RAM available for all VMs on the given ggRock server. You can read more about controlling it here. Clicking on the link will allow you to change this setting
Once you are ready and happy with the setting you can hit Create. After you do so a new Machine entry will appear, with a VM icon next to its name, as shown below
 Manage Virtual Machine on Machines page
You can control every aspect of a VM with the Machine Menu that can be accessed by clicking a three-dot icon on the very right of the row with the VM
 On this screen you can see your regular Machine Menu sections 1-3, 7-8 enriched with three new options (4-6):
-
(4) Control the VM
This option allows the user to open VM Control view with an actual hypervisor as a part of the web page, that allows to directly interact with the VM -
(5) Stop the VM. Only available after the VM is online
Stops the VM forcefully, shutting it down in the same way as you would do using the Power button on the physical PC -
(6) Reset the VM. Only available after the VM is online
Resets the VM - effectively stopping it and starting it over again
Control the VM page
Control the VM page is dedicated place to manage every aspect of your VM, including the actual system interaction. With the VM disabled it looks like this
 Each button here provides it's distinct functionality:
-
Get back to the Machines list
-
Deletes a VM outright
-
Apply writebacks from this Machine to both images. Read here to learn more about writebacks.
-
Opens up a VM Settings modal. Read here to learn more about VM Settings
-
Turns on or Shuts Down the VM
-
Gracefully reboots the VM when it's on, but only with ggLeap present and synchronized on the VM
 This is how your Control VM page will look like once you have a VM up and running.
-
Clicking Open in new tab will open only the VM interactive area in a new tab, where you can then press F11 to enter full screen mode if your goals require that
VM Settings
VM Settings modal is largely unchanged from the Client Machine Settings modal. The only difference is the additional VM Settings tab on the bottom and slightly different function of the Name field


On the screenshot above you can change, at any time:
-
Change the name of the VM
-
Adjust OS Image used with the VM
-
Adjust Game Image used with the VM
-
Adjust any other VM settings once the VM is offline
This menu is also available from the Machines page.