
Images A visual and thorough guide to the Images tab.
Table of Contents
-
Using a single ggRock game image with multiple system images
-
Unlocking SSH Under Root on Target Server Via Terminal (Advanced)
About
Images are a logical way to categorize and organize the data we wish to store in ggRock. We refer to images as such because they are not the same as the physical drives in your server, or the physical drives in any other computer system - they are mounted over the network via iSCSI.
The ggRock architecture relies on two primary categories of images:
-
System Images
-
Game Images
Typically, a system image can be treated like the C:\ drive or boot drive of a standard system. That is to say, it contains the operating system, settings, and any applications that require being installed to the C:\ drive.
The Game image is more specialized - it contains only what you install to it, which, in most cases, consists of games, launchers, and any other applications or utilities that can be easily installed there. Typically you would mount your games image as the G:\ drive, but it may be any drive letter you wish.
Every system in your center that has a given system image selected will boot from that system image. Every system in your center that has a given game image selected will mount that game image at boot time.
Image Compatibility
It is important to ensure that the system image and game image for a given system remain synchronized. This means that if you apply writebacks for a system image, you should do the same for the game image.
Creating an Image
NOTE:
This process should only currently be used for creating Game images, unless otherwise directed by support staff.
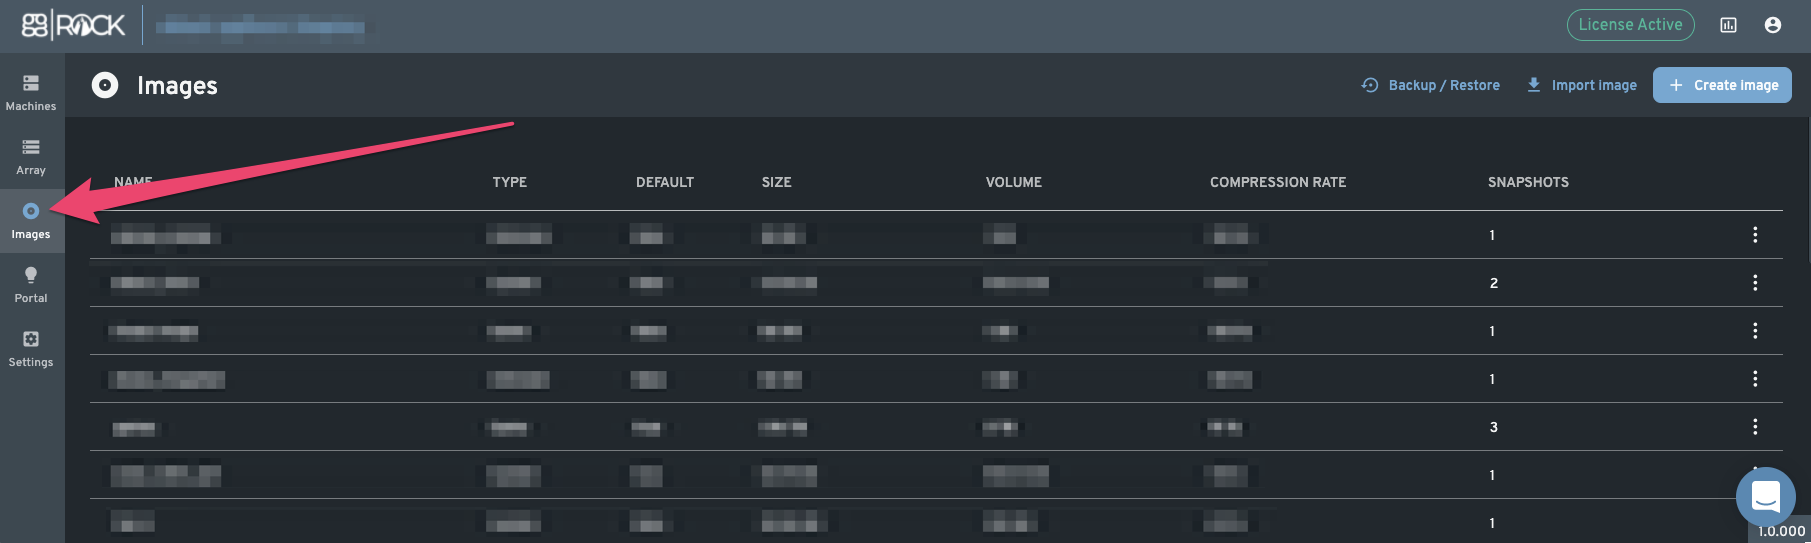
1. From the ggRock Web UI, click the "Images" tab.
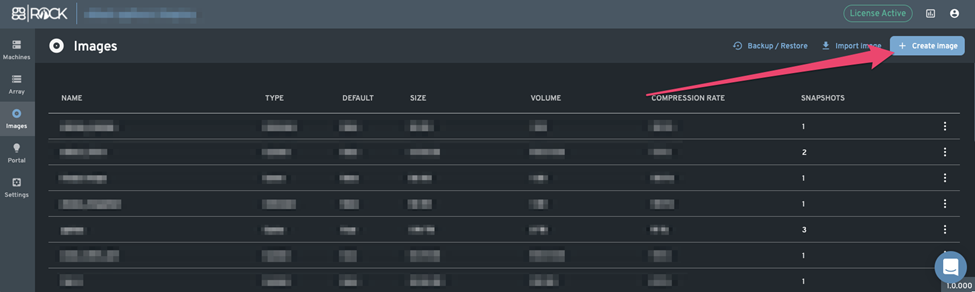
2. From the "Images" tab, Click the "Create Image" button.
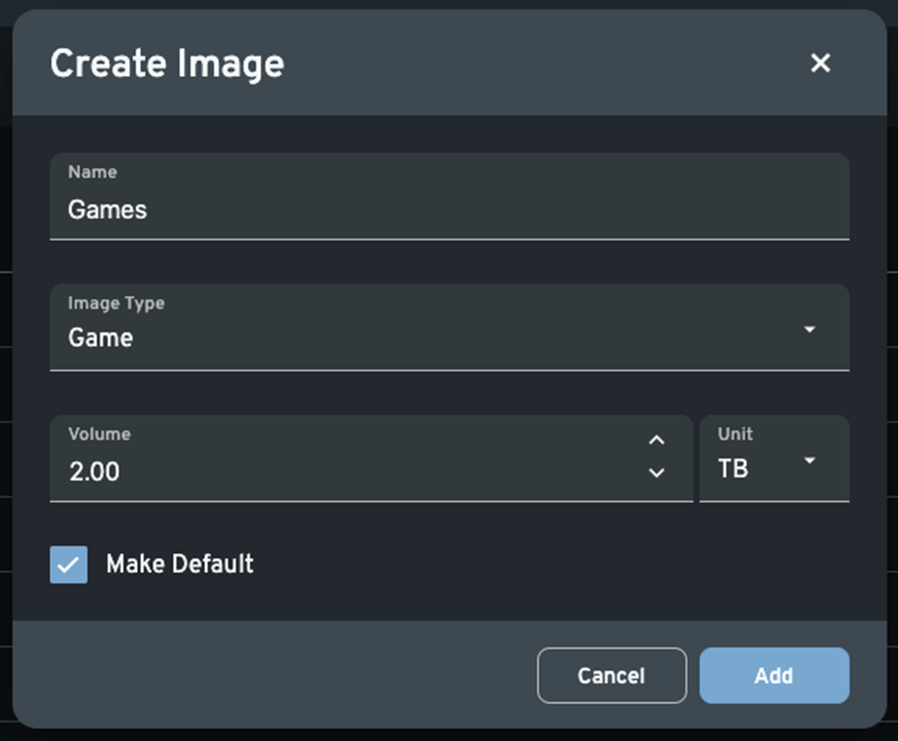
3. Within the "Create Image" dialog, fill out the following information:
-
Name Text Box: Enter a name for your image.
-
Image Type Drop-Down: Select "Game" as the type, unless otherwise specified by support staff.
-
Make Default Checkbox: If you wish this to be the default for all systems, place a check here.
-
Volume Text Box: Set a size for your new image
-
Volume Size Unit Drop-Down: Select a unit type to use with your image (Bytes, Kilobytes, Megabytes, Gigabytes, or Terabytes).
Adding an Image from Disk
To import an image (VHD/VHDX) stored on an external drive:
1. Plug the drive directly into your ggRock server via USB (USB 3.0 is preferred).
2. From the ggRock Web UI, click the "Images" tab.

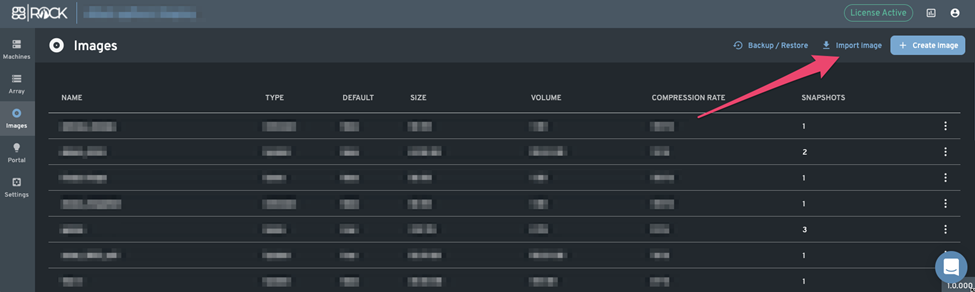
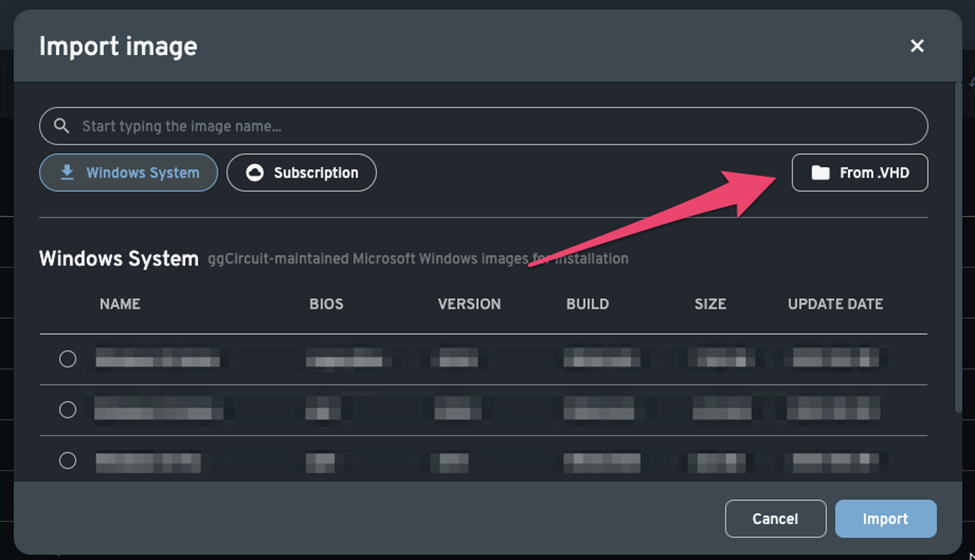
3. From the "Images" tab, click the "Import Image" button.
4. Within the "Import Image" dialog, click the "From .VHD" button.
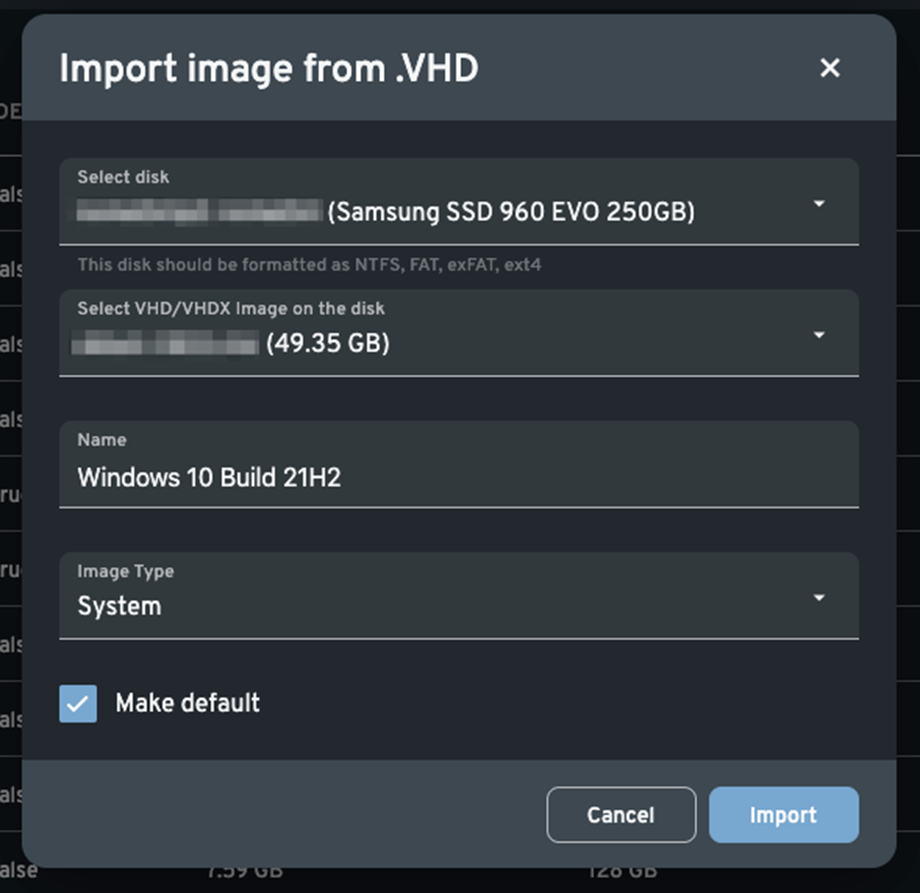
4. Within the "Import image from .VHD" dialog, fill out the following information:
-
Select disk drop-down: Select the physical disk on the server you wish to import the image from.
-
Select VHD/VHDX Image on the disk drop-down: Select the VHD/VHDX image you wish to import from the selected disk.
-
Name Text Field: Give the image a friendly name
-
Image Type Drop-Down: Select the type of image to import as - System image is the likely candidate here.
-
Make Default Checkbox: Check this box to make this image the default for all systems.
Backing Up Images
There are two mechanisms through which images may be backed up:
-
Local - Store backups locally, either on an additional drive connected to the server, or on the root partition (not recommended for mission critical backups).
-
Remote - Store backups on a backup ggRock server
Performing a Local Backup
1. Plug a drive into your ggRock server via USB, or utilize a drive installed physically in the server chassis.
2. From the ggRock Web UI, click the "Images" tab.
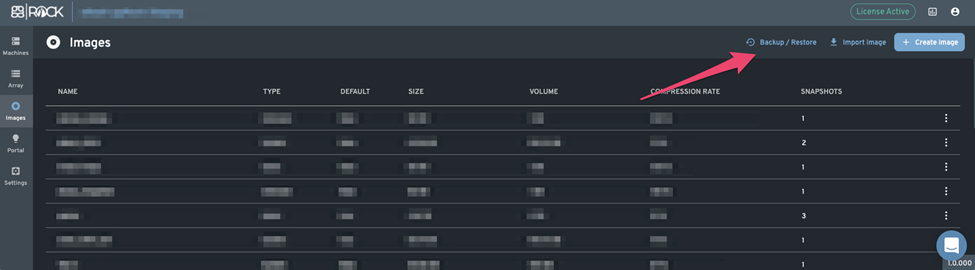
3. From the "Images" tab, click the "Backup/Restore" button.
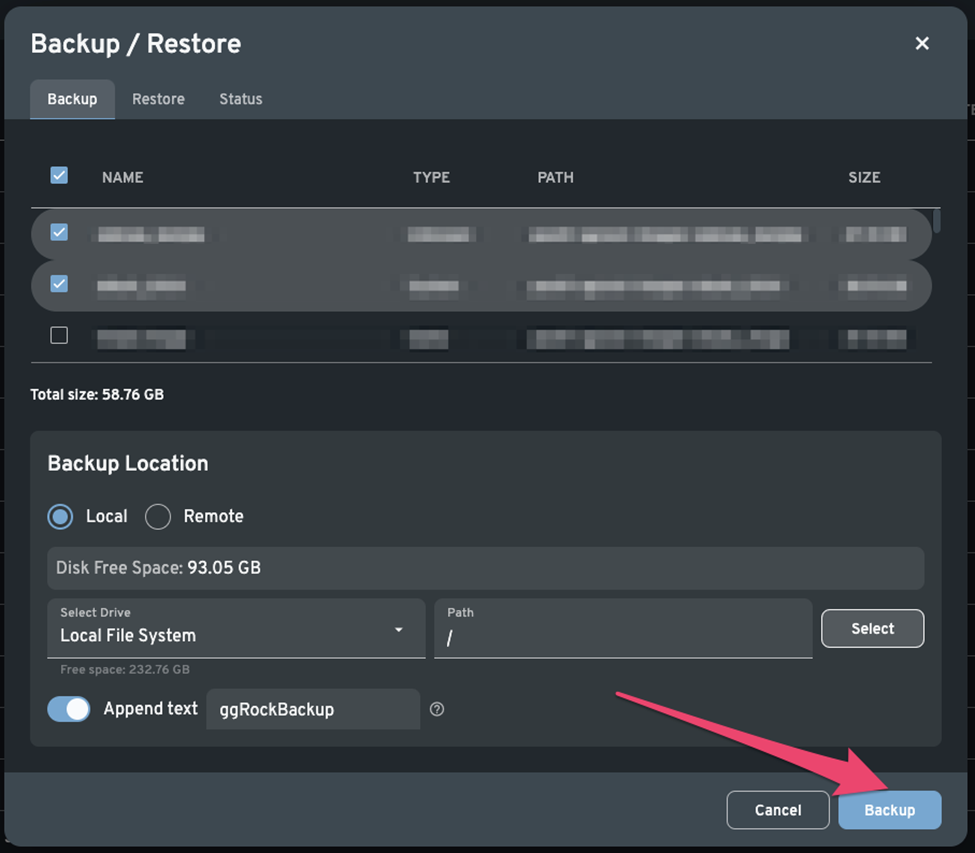
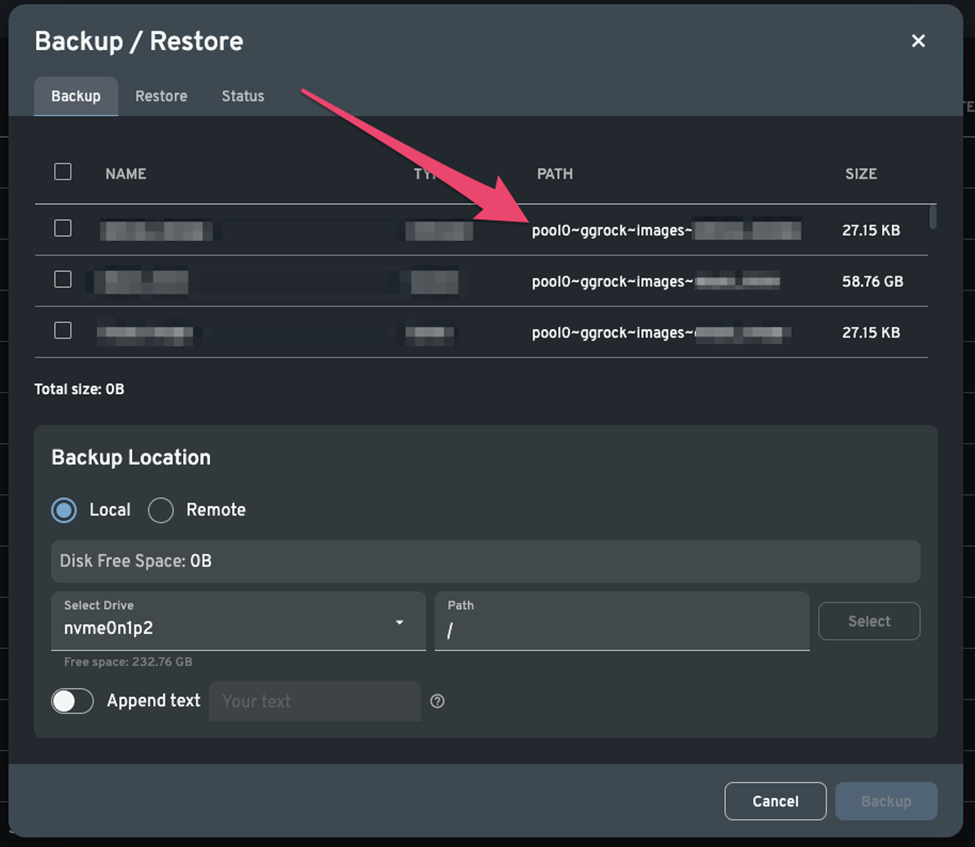
4. Within the "Backup/Restore" dialog, ensure the "Backup" tab is selected and fill out the following information:
-
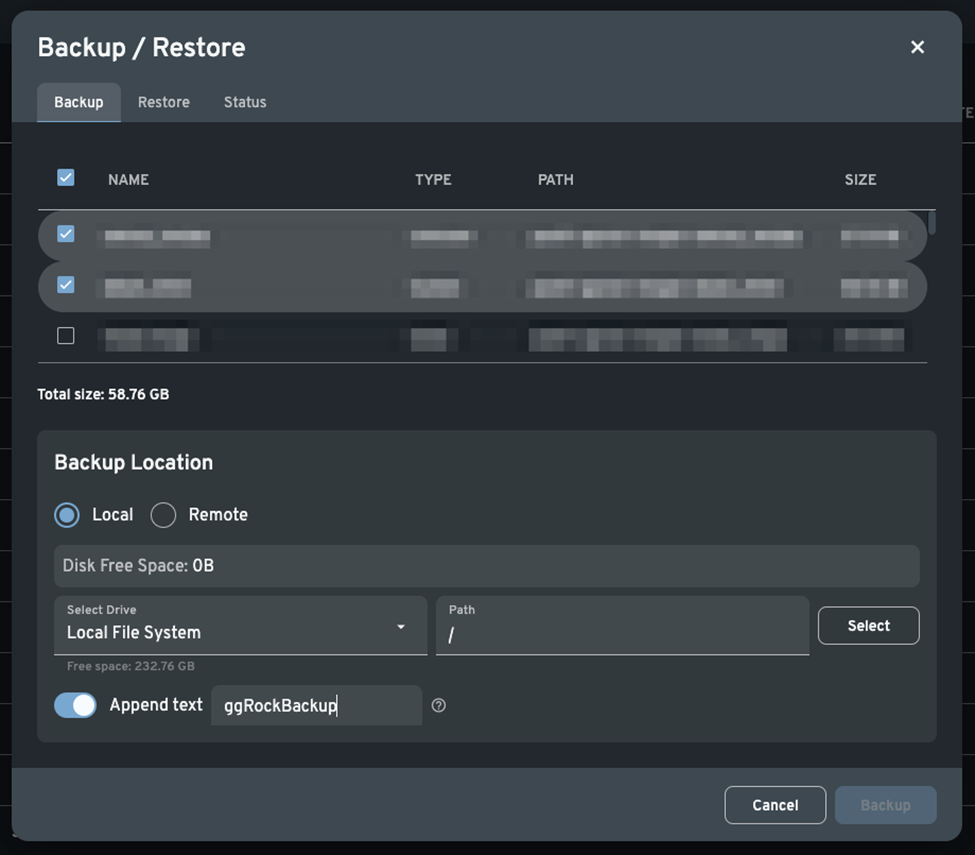 Image Checkboxes: Place a check next to each image you wish to back up.
 -
Location Radio Button: Set the location to "Local".
-
Select Drive Drop-Down: Select the physically-connected disk to which you wish to back up your images (it is not recommended to back up to the local filesystem unless you intend to copy the image elsewhere afterward)
-
Path Text Box: Set the path on the volume to which you wish to back up your images.
-
Select Button: Click this button to activate the selected drive and path for backup.
-
Append Text Toggle: Turn this toggle on to enable appending a suffix to your filename.
-
Append Text Text Box: Enter the suffix to append to your filename.
4. Click the "Backup" button to begin the backup operation.
Performing a Remote Backup
1. From the ggRock Web UI, click the "Images" tab.
2. From the "Images" tab, click the "Backup/Restore" button.
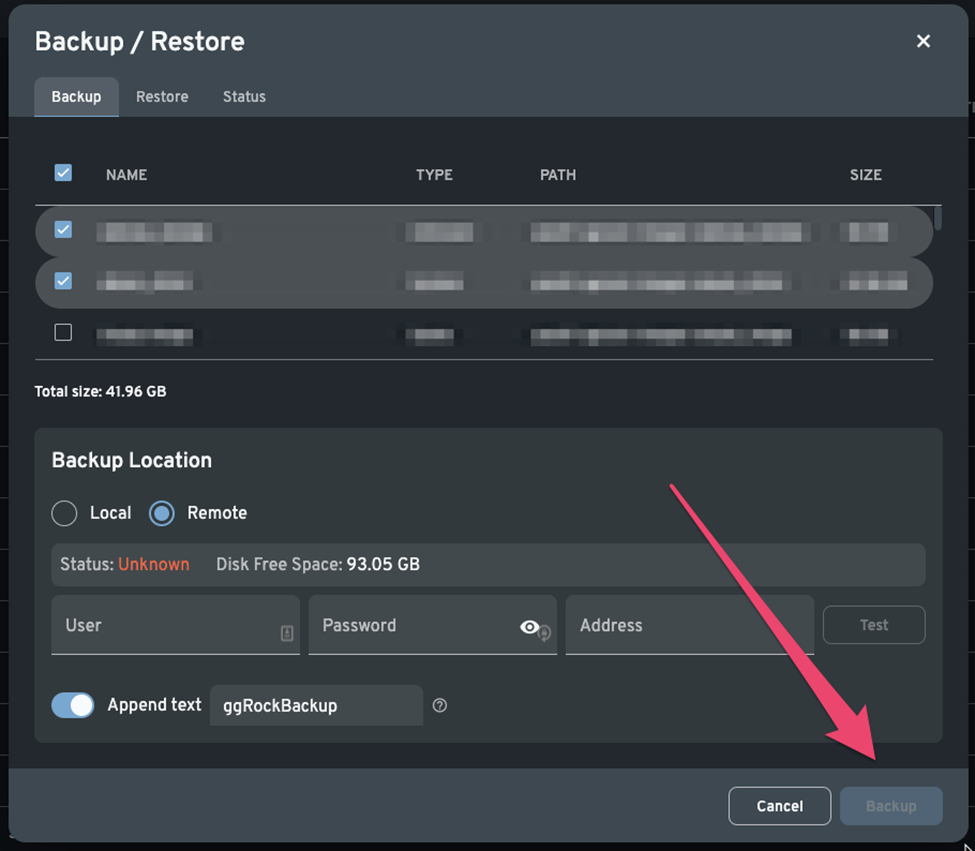
3. Within the "Backup/Restore" dialog, ensure the "Backup" tab is selected and fill out the following information:
-
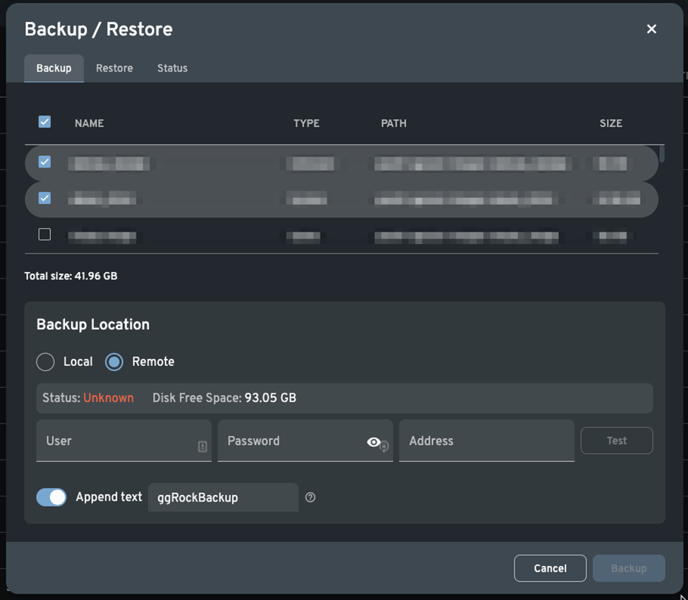 Image Checkboxes: Place a check next to each image you wish to back up.
 -
Location Radio Button: Set the location to "Remote".
-
User Text Box: Enter the username used to log into the remote system.
-
Password Text Box: Enter the password used to log into the remote system.
-
Address Text Box: Enter the DNS name or IP address of the remote system.
-
Test Button: Test the connection to the remote system.
-
Append Text Toggle: Turn on this toggle to append a suffix to your filename.
-
Append Text Text Box: Enter the suffix to append to your filename.
5. Click the "Backup" button to begin the backup operation.
Restoring Images
There are two mechanisms through which images may be restored:
-
Local - Restore backups from a locally-connected drive, either from an additional drive connected to the server, or from the root partition (not recommended for mission critical backups)
-
Remote - Restore backups from a backup ggRock server
Restore an Image from a Local Disk
1. Plug a drive into your ggRock server via USB, or utilize a drive installed physically in the server chassis.
2. From the ggRock Web UI, click the "Images" tab.
3. From the "Images" tab, click the "Backup/Restore" button.
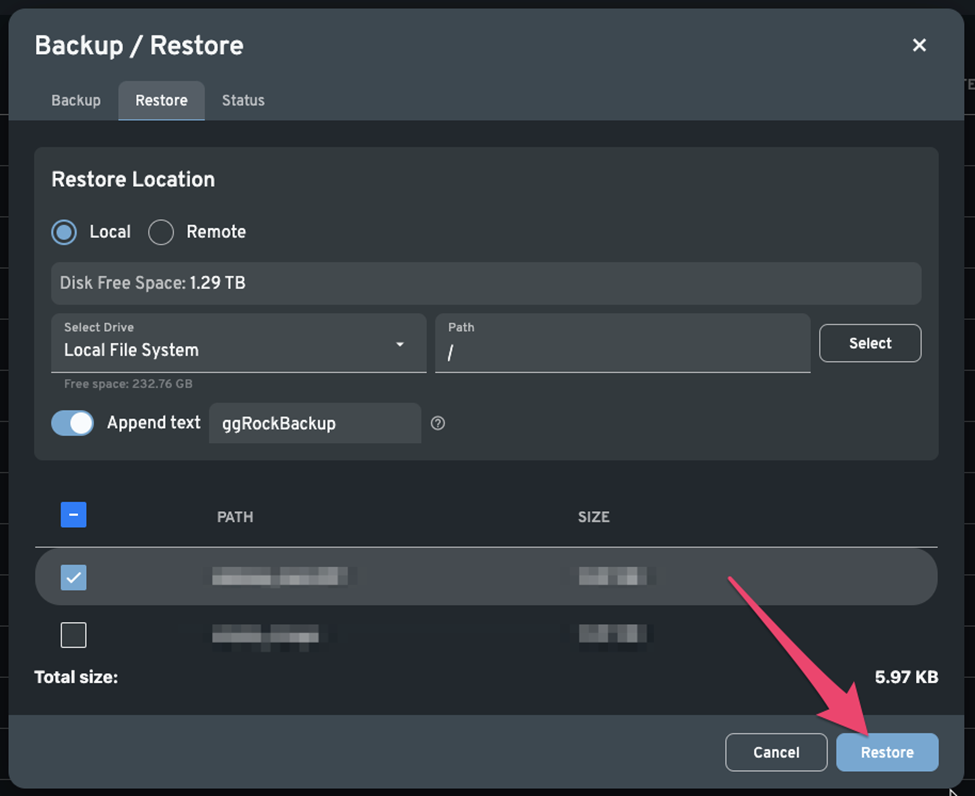
4. Within the "Backup/Restore" dialog, ensure the "Restore" tab is selected and fill out the following information: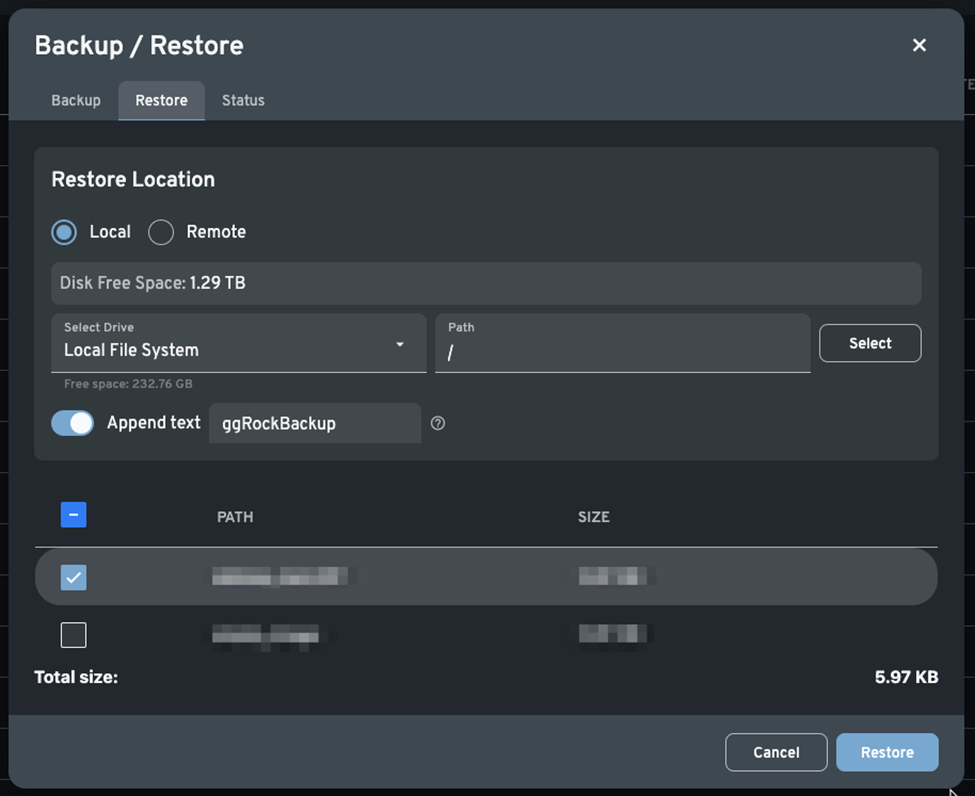
-
Location Radio Button: Set the location to "Local".
-
Select Drive Drop-Down: Select the physically-connected disk from which you wish to restore your images.
-
Path Text Box: Set the path on the volume from which you wish to restore your images.
-
Images List Box: Place a check next to the images you wish to restore to your server.
-
Append Text Toggle: Turn on this toggle to append a suffix to your filename.
-
Append Text Textbox: Enter the suffix to append to your filename.
5. Click the "Restore" button to begin restoring your image(s).
Restore an Image from a Remote Server
1. From the ggRock Web UI, click the "Images" tab.
2. From the "Images" tab, click the "Backup/Restore" button.
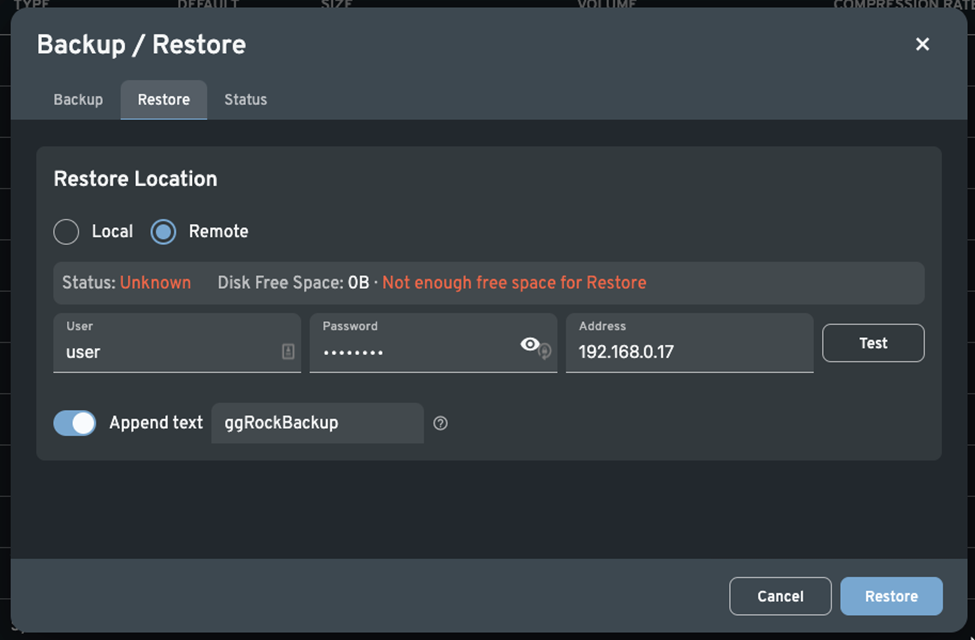
4. Within the "Backup/Restore" dialog, ensure the "Restore" tab is selected and fill out the following information: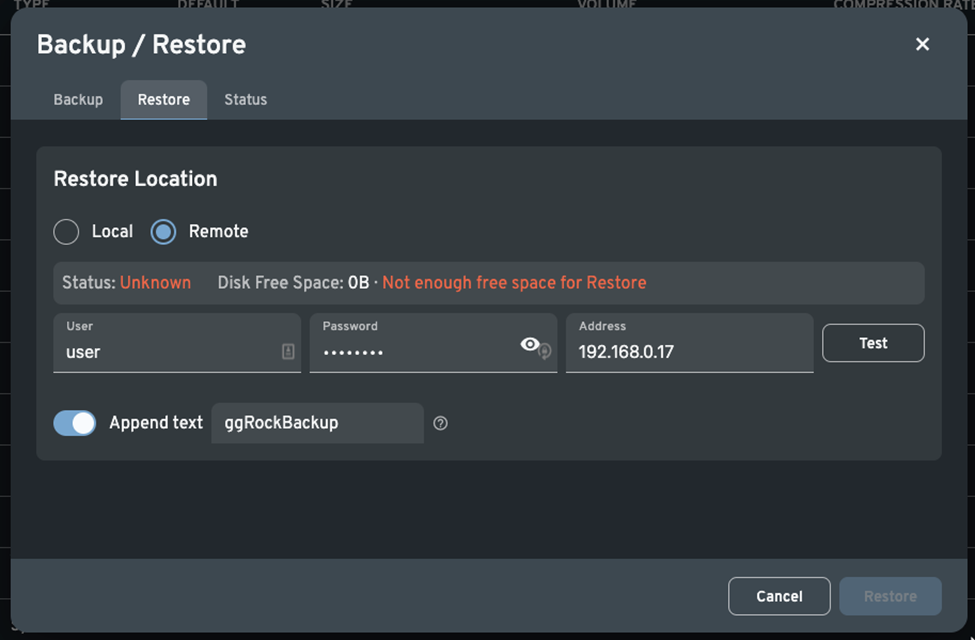
-
Location Radio Button: Set the location to "Remote".
-
User Text Box: Enter the username used to log into the remote system.
-
Password Text Box: Enter the password used to log into the remote system.
-
Address Text Box: Enter the DNS name or IP address of the remote system.
-
Test Button: Test the connection to the remote system.
-
Append Text Toggle: Turn on this toggle to append a suffix to your filename.
-
Append Text Text Box: Enter the suffix to append to your filename.
5. Click the "Restore" button to begin restoring your image(s).
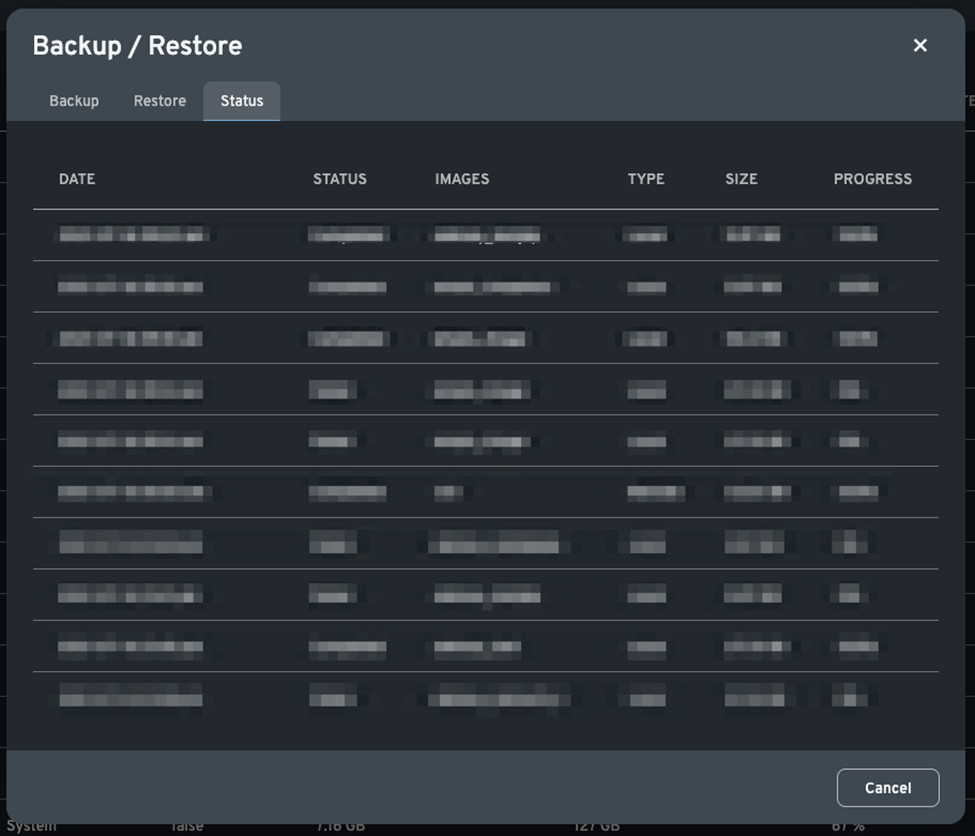
Status
From the status tab you may view the history of any backup or restore operations that have been attempted or completed.
1. From the ggRock Web UI, click the "Images" tab.
2. From the "Images" tab, click the "Backup/Restore" button.
3. Within the "Backup/Restore" dialog, select the "History" tab to view the status of any attempted or completed backup/restore operations.
Backing Up Images Via Terminal (Advanced)
To allow you to back up your images, with all of their Writebacks and Snapshots you can use the following CLI (Console Line Interface) tool: ggrock-img
To backup your Images you can use the following console command:
ggrock-img command [command options]
Command syntax
send -p|--pool <pool_name> -i|--image <image_name>
receive -p|--pool <pool_name> -i|--image <image_name>
Examples (Advanced)
Backing up image to a file:
ggrock-img send -p pool0 -i games > games.img
Restoring an image from the backup file:
ggrock-img receive -p pool0 -i games < games.img
Backup an image to the file and display progress:
ggrock-img send -p pool0 -i games | pv > games.img
Restore an image from the backup file and display progress:
cat games.img | pv | ggrock-img receive -p pool0 -i games
Clone the image to another ggRock server over SSH:
ggrock-img send -p pool0 -i games | pv | ssh host2 ggrock-img receive -p pool0 -i games
Finding the Pool Name
The pool name can be found within the Backup/Restore dialog in the "PATH" column.
Listing Your Drives Via Terminal (Advanced)
Now, to get your drive actually ready to receive backups from ggRock you need to find it’s letter and mount it.
Execute the following command:
lsblk -I 8 -b -o NAME,PATH,FSTYPE,LABEL,SIZE,MODEL,SERIAL,MOUNTPOINT,RM
You will get a list of all of your drives and identify the one you inserted using the Model column:
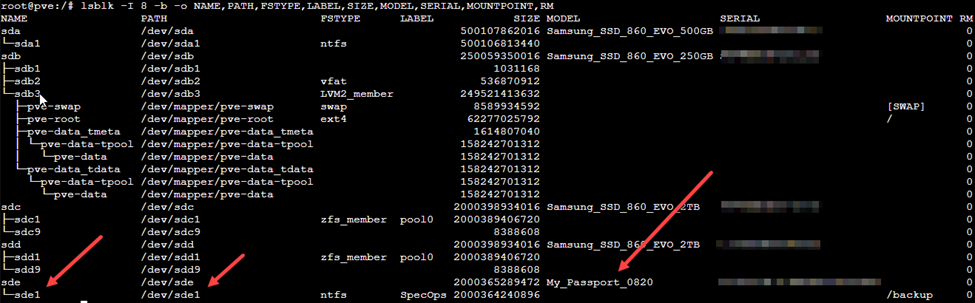
Mounting a Drive Via Terminal (Advanced)
Identify the path value for your drive and execute the following command:
mkdir /backup && mount /dev/sde1 /backup
It will create a “folder” called backups, which will be associated with your entire drive
Executing a Backup Via Terminal (Advanced)
Now, once we’re done, you can simply combine the knowledge above, and execute the following command:
ggrock-img send -p pool0 -i windows_10_1809 | pv > /backup/windows_10_1809.img
The template is:
ggrock-img send -p pool0 -i %image_name% | pv > /backup/%desired_backup_image_name%.img
You will see a progress bar like this:
 It displays size and speed in Mb/Gb, so to get an ETA you can multiply your size of the image (in GB) over 8. For our 95.74GB it’s 766 Gb. With a speed of 0.09Gb/s it will take us roughly 2 hours 20 minutes to backup this image to an external drive. Bottleneck here is the drive itself. For faster backups we recommend USB3 SSD drives and Network backups
Un-mounting a Drive Via Terminal (Advanced)
Drive will be unmounted automatically once you pull the drive. However, to clean up everything, please execute:
umount /dev/sde1 && rmdir /backup
Remote Backup Via Terminal (Advanced)
For remote backup you’ll need to ssh under root account into another ggRock server.
This technique can be used to create a CRON job and constantly keep your backup server up to date.
ggrock-img send -p pool0 -i windows_10_1809| pv | ssh root@10.20.30.164 ggrock-img receive -p pool0 -i windows_10_1809
NOTE:
It may be necessary to temporarily enable root SSH access to perform a remote backup via terminal.
Refer to the following support article, however do be careful to ensure the security of the root account by disabling the root account afterward:
Cannot perform a remote backup to a Debian target server due to disabled root SSH access
Use this script in conjunction with a CRON job to automatically back up your system and games images on a schedule. This script keeps 5 copies of the backups - adjust to suit your needs.
#!/bin/bash

# Configuration
SOURCE_POOL="pool0"
SOURCE_GAMES_IMAGE="games"
SOURCE_SYSTEM_IMAGE="system" # Added system image
DESTINATION_HOST="host2"
DESTINATION_POOL="pool0"
DESTINATION_GAMES_IMAGE="games"
DESTINATION_SYSTEM_IMAGE="system" # Added system image
BACKUP_DIR="/path/to/your/backups" # Replace with your backup directory
GAMES_BACKUP_PREFIX="games_backup_"
SYSTEM_BACKUP_PREFIX="system_backup_" # Added system backup prefix
KEEP_DAYS=5

# Create timestamped filename
TIMESTAMP=$(date +%Y%m%d)

# Games Backup
GAMES_BACKUP_FILENAME="${GAMES_BACKUP_PREFIX}${TIMESTAMP}.img"
FULL_GAMES_BACKUP_PATH="${BACKUP_DIR}/${GAMES_BACKUP_FILENAME}"

# System Backup
SYSTEM_BACKUP_FILENAME="${SYSTEM_BACKUP_PREFIX}${TIMESTAMP}.img"
FULL_SYSTEM_BACKUP_PATH="${BACKUP_DIR}/${SYSTEM_BACKUP_FILENAME}"

# Create backup directory if it doesn't exist
mkdir -p "$BACKUP_DIR"

# Perform Games backup
ggrock-img send -p "$SOURCE_POOL" -i "$SOURCE_GAMES_IMAGE" | pv | ssh "$DESTINATION_HOST" "ggrock-img receive -p $DESTINATION_POOL -i $DESTINATION_GAMES_IMAGE > $FULL_GAMES_BACKUP_PATH"

# Check if Games backup was successful (basic check, improve as needed)
if [ $? -ne 0 ]; then
  echo "Games backup failed!"
  exit 1
fi

# Perform System backup
ggrock-img send -p "$SOURCE_POOL" -i "$SOURCE_SYSTEM_IMAGE" | pv | ssh "$DESTINATION_HOST" "ggrock-img receive -p $DESTINATION_POOL -i $DESTINATION_SYSTEM_IMAGE > $FULL_SYSTEM_BACKUP_PATH"

# Check if System backup was successful (basic check, improve as needed)
if [ $? -ne 0 ]; then
  echo "System backup failed!"
  exit 1
fi

# Rotate Games backups
find "$BACKUP_DIR" -maxdepth 1 -type f -name "${GAMES_BACKUP_PREFIX}*.img" -printf '%T@ %p\n' | sort -rn | tail -n +$((KEEP_DAYS + 1)) | cut -d' ' -f2 | xargs rm -f

# Rotate System backups
find "$BACKUP_DIR" -maxdepth 1 -type f -name "${SYSTEM_BACKUP_PREFIX}*.img" -printf '%T@ %p\n' | sort -rn | tail -n +$((KEEP_DAYS + 1)) | cut -d' ' -f2 | xargs rm -f

echo "Games and System backups completed and rotated."

exit 0