
PCs with local drive
Updating PCs in this setup is straightforward and can be done even if there are users on the client PCs. The user session will not be interrupted and the update will commence after the user logs out.
-
In the web admin, go to Settings > Client configuration > Version.
-
Select the PCs that you want to update or click the "Select all" button.
-
Click the "Change version" button after selecting PCs.

4. In the pop-out window, select the version type that you want to use and click "Apply".
 5. Restart or boot PCs to begin an update.
Alternatively, you can also update the client version via the Dashboard.
Update a single PC
-
Select the PC that you want to update.
-
Click the three dots button on the right and go to Settings > Change client version on the drop-down menu.

3. On the pop-out menu, select the version and click "Apply".
Update several PCs
-
Select the PCs that you want to update or click the box on the top left side of the PC list to select all.

2. The menu will appear at the top of the PC list. Go to More actions > Change client version.
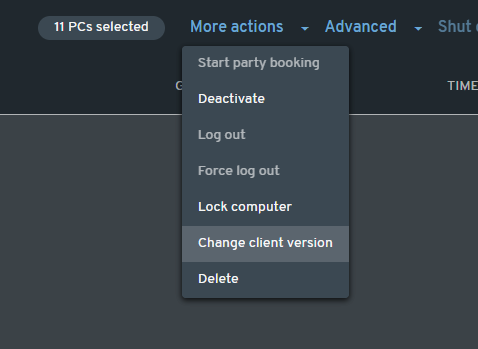
3. On the pop-out menu, select the version and click "Apply".
PXE environment
Please make sure to follow the steps below for updating the client version in diskless/PXE setup.
-
Go to your PXE's client PC manager and select a PC that will be used as "super client".
-
In the web admin, go to Settings > Client configuration > Version.
-
Select the PC that you assigned as "super client" and update it to the version that you prefer. Restart the PC and wait until it is updated.
-
Once the "super client" is updated, confirm that the client updated to the correct version and check if it is working properly.
-
After making sure that the client is updated and working, turn that PC off and save the image in the PXE's client manager.
-
Go back to the web admin and update the rest of the PCs.
To view this article in a separate browser tab, click here.