
The ggLeap Booking System will enable users to make PC reservations in person or online. This article will show you what you need to know in order to fully utilize this feature.
Table of Contents
- Booking Settings
- How to Allow Employees to Manage Bookings
- Create a New Booking from the Web Admin
- How to Enable Online Booking
Booking Settings
The Booking Settings can be accessed in the ggLeap web admin in Settings -> Bookings. Make sure to click "Save changes" at the bottom of the screen if any changes are made to any of the following:
NOTE:
Only admins or employees with "Can manage booking settings" authorization will be able to access the Booking Settings.
- Booking notifications
Register the email address here of the admins and employees whom you would like to receive email notifications when someone makes a booking. - Client PC booking behaviour
Unoccupied PC - This will enable you to set an amount of time (in minutes) that locks the PC to prevent other people from using it prior to the booking schedule. You can also set an amount of time (in minutes) that unlocks the PC in case the user does not show up.
Occupied PC - This will enable you to set an amount of time (in minutes) that will log out a user from the PC prior to the booking schedule. - Finish booking after log out
Enabling this will allow the PC to become available if the user logs out before the end of their booking.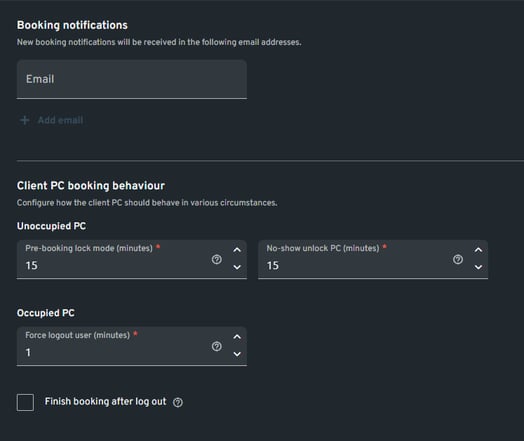
- Payments
This will enable you to require pre-payment from your customers in order to book PCs. - Same day booking options
This enables you to set the amount of time (in hours) that users have to wait in order to book PCs today in the event that all the PCs are in use. - Add User Group Override
This prevents the system from logging out of a specific user group for a set amount of time (in hours) to make the PC available for the same day booking. You can add as many user group overrides as possible. - Excluded devices
This enables you to set which devices cannot be booked by users. You can either prevent booking from a specific area (room) in your center, PC group, or individual PCs.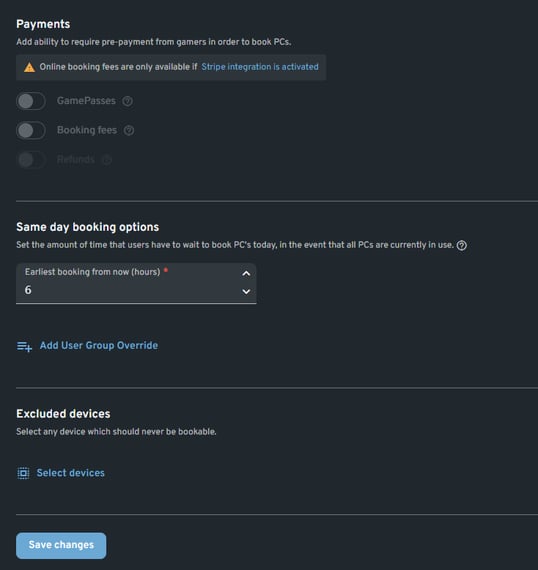
NOTE:
You will need Stripe integration activated to use the pre-payment feature.
How to Allow Employees to Manage Bookings
- Head to Settings -> Employees -> Employee list.
- Click the ellipsis (three dots) on the employee you want to give access to the booking features.
- Select "Edit employee" on the drop-down menu.
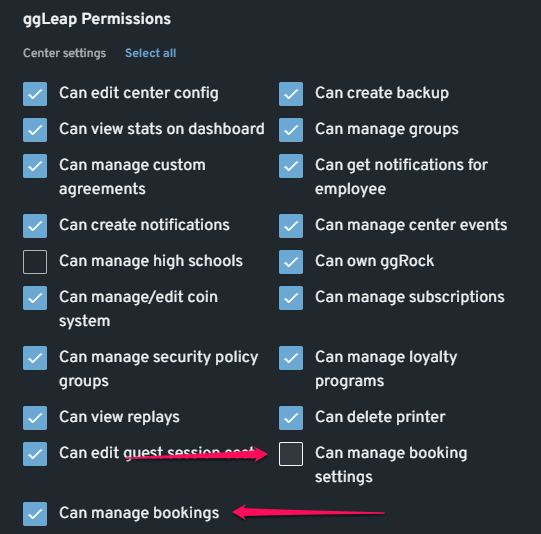
- On the pop-out modal, look under the ggLeap Permissions for the following authorizations:
- Enable "Can manage booking settings" if you want to give the employee access to the Booking Settings.
- Enable "Can manage bookings" if you want the employee to be able to create or edit bookings from the Booking tab.
Create a New Booking from the Web Admin
- Click the Bookings tab on the left side panel.
- On the Bookings page, click the "New booking" button on the upper right corner of the screen if the page is in Agenda view. Alternatively, if the page is in Grid view, you can create a new booking by selecting the PC and start time on the grid.
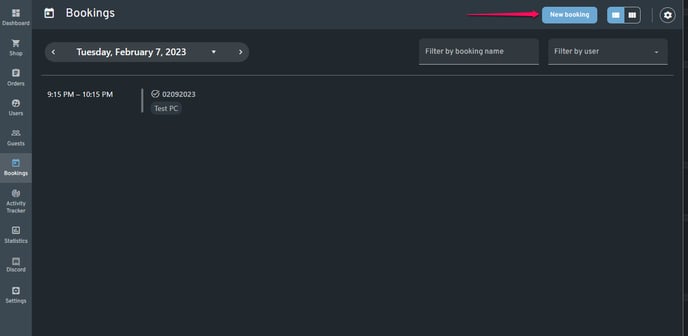
Agenda View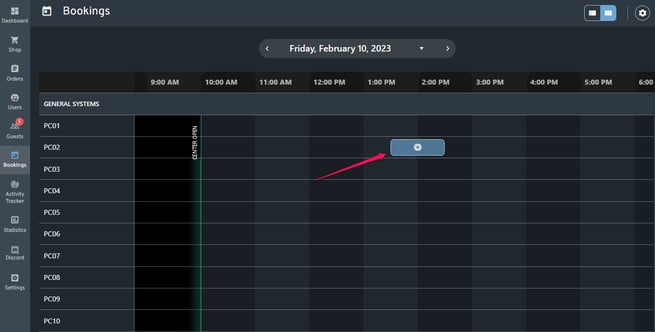
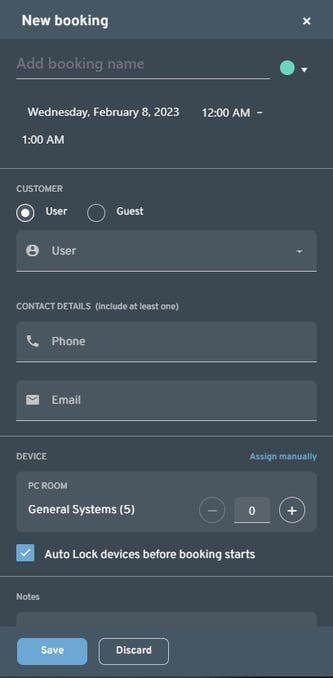
Grid View - The New booking side modal should pop from the right, and from there, you need to fill out the following:
- Add the booking name and assign a color code for better organization of the list.
- Choose the booking date, start time, and end time.
- Select if the customer is an existing user or guest.
- Enter the contact details of the customer.
- Select devices to be reserved and toggle if the devices will lock prior to the start of the booking.
- Enter optional information (e.g., customer request).
- Once the pertinent details are entered, click "Save" to finalize the booking.
NOTE:
The "New booking" button is only accessible on the Agenda (list) view.
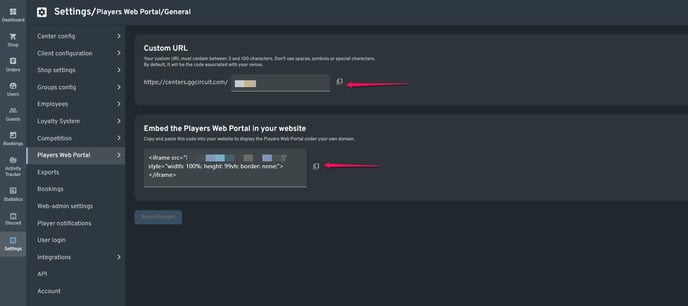
How to Enable Online Booking
- Head to Settings -> Players Web Portal -> General.
- Copy the link found under Custom URL and share it on your social media channels or website. The link will send any visitors to your center's booking page.
- Alternatively, you can embed the Players Web Portal in your website using the code provided.
NOTE:
Enhance your customer's experience by customizing the Players Web Portal's appearance. This can be done in Settings -> Players Web Portal -> Appearance.