
Does a customer want to return an item? This article will cover the many ways how you can refund a transaction.
Table of Contents
Activity Tracker
1. Click the Activity Tracker tab from the left side panel.
2. Look for the order that you want to refund and click "Transaction" under the "Details" column.
![]()
3. Click the "Refund" button on the receipt page.
![]()
4. On the pop-out modal, set the number of items to be refunded and click the "Refund" button.
![]()
User Profile
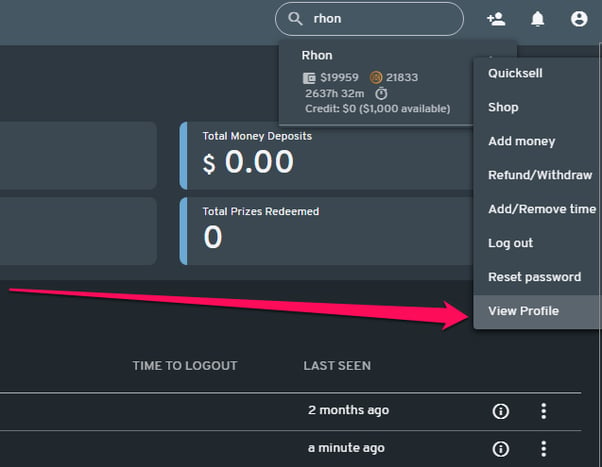
1. On the Dashboard, search for the user using the Search user field on the upper right side of the screen.
2. Once you have located the user, click the ellipsis (three-dots) icon and select "View Profile" from the drop-down menu.
NOTE:
Alternatively, if the user is logged in on a PC, you can click their username from the Dashboard. Then select "View Profile" from the drop-down menu. This applies to both the Graphical and List views of the Dashboard.
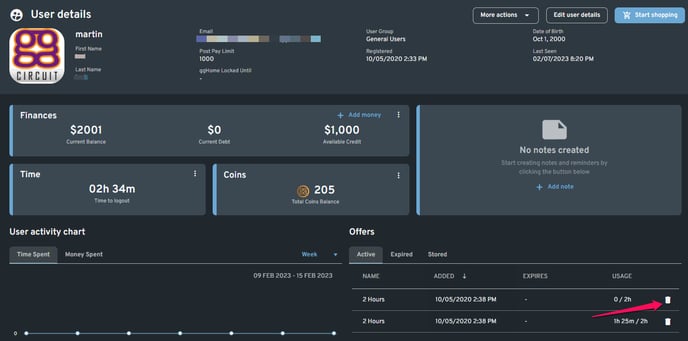
3. On the user's profile page, look for the Offer section. It will list all the user's GamePass.
4. Locate the GamePass that needs to be refunded and click the trash icon on the right side.
5. Click the "Refund" button on the receipt page.
6. On the pop-out modal, set the number of GamePass to be refunded and click the "Refund" button.
NOTE:
The User Profile method only works for refunding a GamePass.
Statistics
1. Click the Statistics tab from the left side panel.
2. On the Statistics page, you can either use Sales or Income to look for the transaction that needs to be refunded. Just click "View details" to open the records.

NOTE:
If you are looking for an older transaction, you can use the "Custom range" filtering to open the statistical records of a particular date.
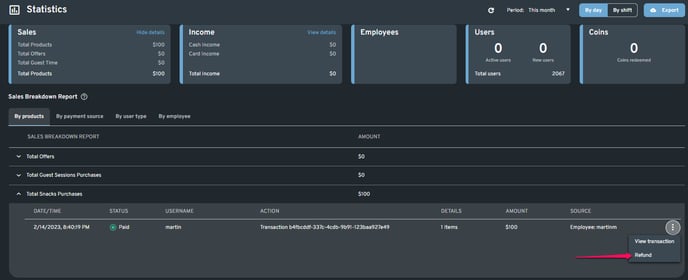
3. Both Sales and Income have reports that are organized by categories. You may need to sift through the data to find the transaction.
4. Once the transaction has been located, click the ellipsis (three-dots) icon on the right and click "Refund" on the drop-down menu.
5. Click the "Refund" button on the receipt page.
6. On the pop-out modal, set the number of items to be refunded and click the "Refund" button.
Client Orders
1. Click the Orders tab from the left side panel.
2. On the Orders page, select Transactions. This will open the list of all the completed and refunded transactions.
3. Once the transaction has been located, click the ellipsis (three-dots) icon on the right and click "Refund" on the drop-down menu.

4. Click the "Refund" button on the receipt page.
5. On the pop-out modal, set the number of items to be refunded and click the "Refund" button.
Time Added via Legacy Mode
NOTE:
This will only apply to the time that was added using the Legacy mode. The refund amount will be based on the price set under General Configuration in Financial Configuration.
1. On the Dashboard, search for the user using the Search user field on the upper right side of the screen.
2. Once you have located the user, click the ellipsis (three-dots) icon and select "View Profile" from the drop-down menu.
3. On the user's profile page, look for the Time section. It will show how much time the user has on their account.
4. Click the ellipsis (three-dots) icon and select "Remove time" from the drop-down menu.
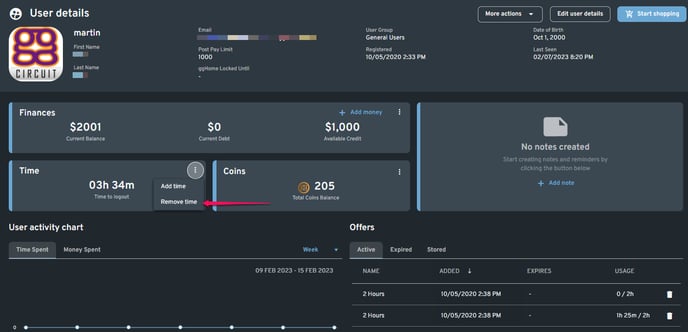
5. On the Add/Remove time modal, select "Remove time" and set how much time needs to be removed/refunded.
6. Click the "Remove" button to complete the refund process.