- ggCircuit Help Center
- ggLeap User Manual
- Configuration - ggLeap Client
-
ggLeap User Manual
- Sales - Point of Sale
- Management - Users
- Configuration - Games and Apps
- Troubleshooting
- Management - Machines
- Management - Consoles
- Sales - Client Orders
- Reporting - Finance
- Getting Started
- Configuration - ggLeap Client
- Configuration - ggLeap Web Admin
- Start Up Commands
- Sales - Prize Redemption
- ggLeap Client
- Web Admin Settings
- Single Sign On (SSO)
- Configuration - Game Licenses
- Management - Machine Groups
- Getting Started with ggLeap
- Reporting - Statistics
- Management - Employee
- Sales - Guest Accounts
- Loyalty System
- Booking
- Events / Arcade
-
ggRock User Manual
- General
- Installation - Debian OS
- Installation - ggRock Server Application
- Administration - ggRock
- Administration - ggLeap
- Administration - Windows
- Administration - Debian OS
- Administration - Games
- Administration - Hardware
- Administration - Network
- Troubleshooting - ggRock
- Troubleshooting - Network
- Troubleshooting - ggLeap
- Troubleshooting - Hardware
- Troubleshooting - Boot
- Troubleshooting - Windows
- Troubleshooting - Games
- Troubleshooting - Debian OS
-
ggLeap Product Tours
Customizing the Task Bar (deprecated)
Customizing the Task Bar Task Bar functions and customization. Jason McIntoshThe task bar can be seen located on top of the ggLeap UI screen. It allows you to launch and view apps that are currently open. Listed below are the parts of the task bar:


Home button
Volume slider
Notifications button
Quicklaunch area
Currently running apps
Language selector
Settings button
Lock PC button
Log out button
Clock
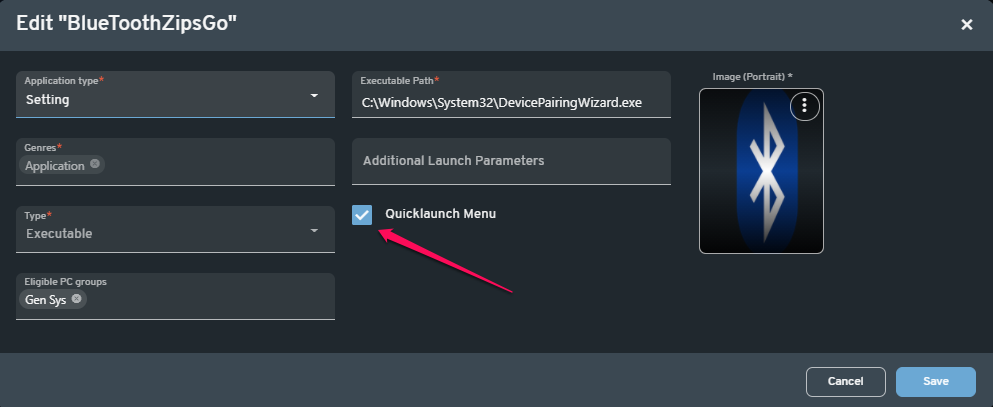
Enable apps to show up in quicklaunch area
-To customize the quicklaunch area on the task bar, go to Settings > Client configuration > Games/Apps.
-Select the game or app icon and check the “Quicklaunch Menu” option on the window.
-Click “Save” to keep the current setting.

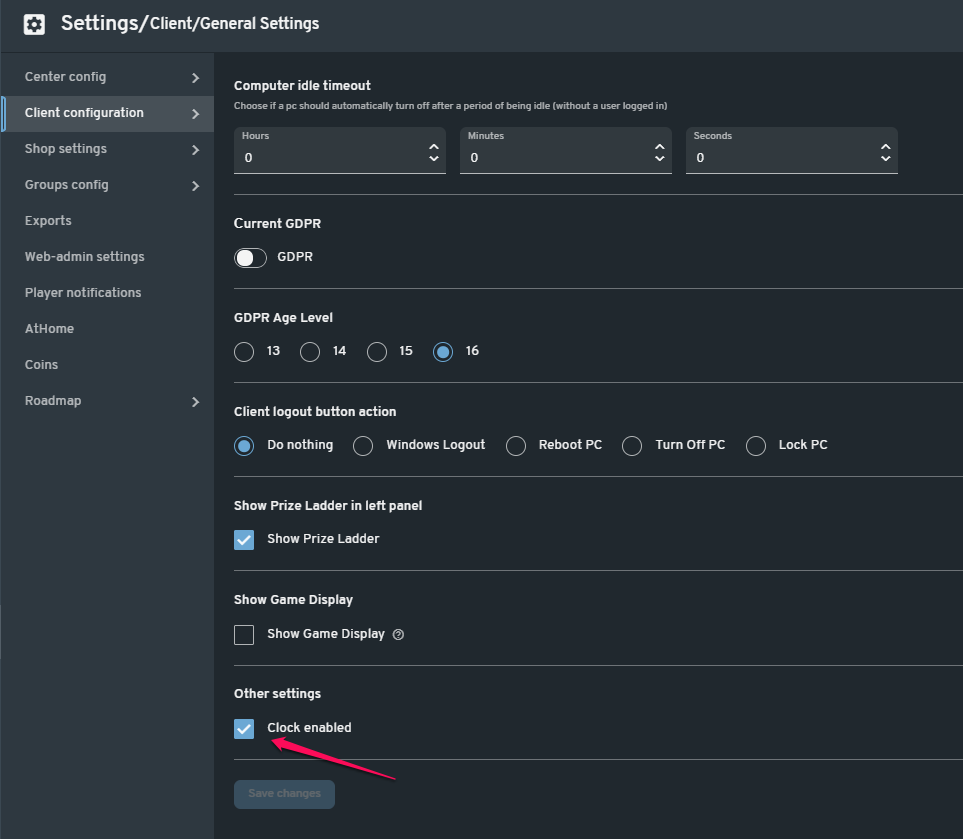
Enable clock in the client
-Head to Settings > Client Configuration > General Settings.
-Check "Clock enabled" and click "Save".


NOTE: Make sure to restart PC after making any changes in the web admin in order for the settings update to take effect in the client.
 Did this answer your question?
